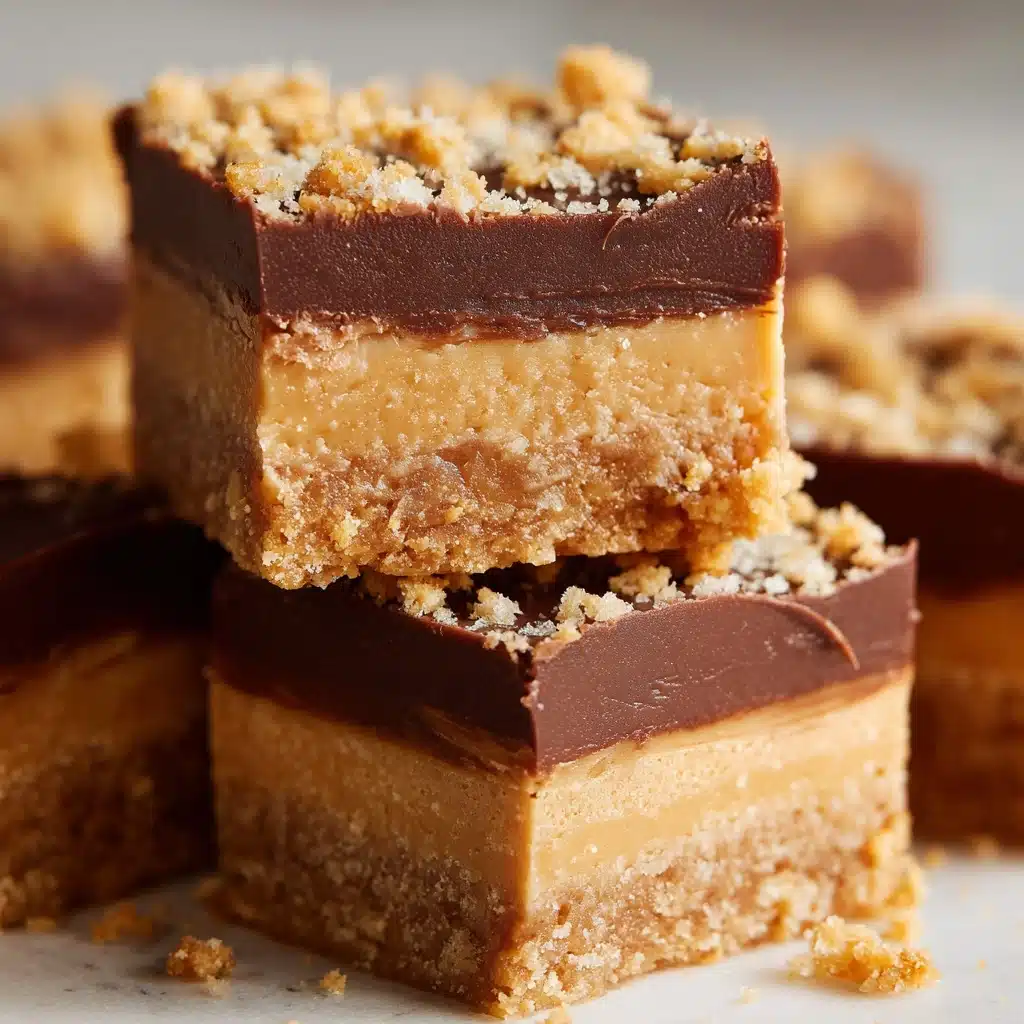
If you’ve ever wandered through Disneyland, soaking up the sun and the magical smells drifting from every corner, you know there are certain treats that make the whole experience unforgettable. One of those nostalgic bites is the iconic Disneyland Peanut Butter Squares—a heavenly marriage of creamy peanut butter, a touch of crunch from graham crackers, and a glossy, dreamy layer of chocolate on top. Whether you’re craving a little Disney magic at home or just want a decadent, crowd-pleasing no-bake dessert, this is truly the recipe for you.
Ingredients You’ll Need
You’d be amazed by how a handful of pantry staples turns into something truly magical. Each ingredient here is simple, but they come together in perfect harmony to create the flavor and texture that make Disneyland Peanut Butter Squares so special.
- Unsalted Butter: Softening the butter lets it easily combine with the peanut butter for an extra creamy base.
- Creamy Peanut Butter: The hero of this dessert, giving that unmistakable nutty punch and smooth texture we all adore.
- Powdered Sugar: Brings sweetness and helps the mixture firm up into sliceable squares.
- Graham Cracker Crumbs: Adds a lovely, subtle crunch and balances out the creamy layers.
- Vanilla Extract: A splash elevates the flavors and deepens the sweetness.
- Milk Chocolate Chips: Melts into a silky, decadent topping that’s impossible to resist.
- Creamy Peanut Butter (for topping): Helps the chocolate layer stay smooth, glossy, and rich.
How to Make Disneyland Peanut Butter Squares
Step 1: Prepare the Pan
Start by lining an 8×8-inch baking pan with parchment paper, leaving some overhang on the sides. This little tip is a lifesaver—it makes it so much easier to lift out the bars later, keeping those perfect, bakery-style edges intact.
Step 2: Mix the Peanut Butter Base
Grab a medium bowl and beat together the softened unsalted butter and half a cup of creamy peanut butter until everything is velvety-smooth and evenly blended. Next, add in the powdered sugar, graham cracker crumbs, and vanilla extract. Mix until you have a thick, cohesive dough—don’t be afraid to use your hands at the end to really bring it all together! The dough should hold together nicely and have that irresistibly nutty scent.
Step 3: Press Into the Pan
Transfer the peanut butter mixture into your prepared pan. With clean hands or the back of a spatula, press it down really firmly and evenly. The firmer you pack it, the better your squares will hold their shape and give you that satisfying bite every time.
Step 4: Melt and Spread the Chocolate Topping
In a microwave-safe bowl, combine the milk chocolate chips and two tablespoons of creamy peanut butter. Microwave in 30-second bursts, stirring thoroughly after each interval, until melted and completely smooth. This glossy mixture is your crowning touch—pour it gently over the peanut butter layer and use a spatula to spread it evenly from corner to corner.
Step 5: Chill and Slice
Refrigerate the pan for at least two hours, or until everything is completely set (believe me, the wait is worth it). When you’re ready, use the parchment overhang to lift the whole slab out and onto a cutting board. Slice into 16 indulgent squares of pure happiness. That’s it—Disneyland Peanut Butter Squares ready to share, or keep all to yourself!
How to Serve Disneyland Peanut Butter Squares

Garnishes
Give your Disneyland Peanut Butter Squares a magical finishing touch with a sprinkle of flaky sea salt, a dusting of extra crushed graham crackers, or even a light drizzle of melted white chocolate. Each adds a fun new layer of flavor or a spark of visual appeal.
Side Dishes
These rich squares are best enjoyed with something light and refreshing on the side—sliced strawberries or a scoop of vanilla ice cream make perfect companions. If you’re serving them at a party, a platter of fresh fruit balances the dessert’s decadence beautifully.
Creative Ways to Present
Put your own spin on the presentation! Stack the squares like bricks for a playful, eye-catching tower, or arrange them in cupcake liners for individual treats at a gathering. For a bit of extra Disney pizzazz, tuck colorful sprinkles or tiny flags on top—kids (and adults) will love the playful vibe.
Make Ahead and Storage
Storing Leftovers
Got extras? Just pop your Disneyland Peanut Butter Squares in an airtight container and keep them in the refrigerator for up to a week. They stay wonderfully firm and the flavors only get better as they meld together.
Freezing
For future treat cravings, you can easily freeze these squares. Layer them between sheets of parchment in a freezer-safe container, and they’ll keep their flavor and texture for up to two months. When the craving hits, just thaw them in the fridge overnight.
Reheating
These are best enjoyed chilled or at room temperature, but if you’d like a slightly softer bite, take the squares out of the fridge about 30 minutes before serving. The chocolate will get a lovely, light sheen, but still hold its shape.
FAQs
Can I use crunchy peanut butter instead of creamy?
Absolutely! Crunchy peanut butter adds fun texture to the base of your Disneyland Peanut Butter Squares and a little extra nutty bite in every mouthful. It’s a wonderful way to customize the classic recipe.
Do I have to use graham cracker crumbs?
While traditional and authentic to the Disneyland treat, you can swap graham cracker crumbs for crushed digestive biscuits, vanilla wafers, or even shortbread cookies in a pinch. Your squares will have a slightly different flavor and texture, but still be delicious.
Could I use dark chocolate chips instead of milk chocolate?
You sure can! Dark chocolate gives the topping a richer, slightly bittersweet edge that pairs beautifully with the sweet-salty peanut butter layer. It’s a grown-up twist on these nostalgic bars.
What’s the best way to slice the squares cleanly?
For neat, bakery-style slices, run a sharp knife under hot water and wipe it dry between each cut. This helps the blade glide right through the chilled chocolate layer without cracking or sticking.
Are these suitable for making with kids?
Definitely! The recipe doesn’t involve an oven and comes together quickly, making it a perfect project for little hands who love mixing and pressing. Just supervise the chocolate melting step or help younger children with it.
Final Thoughts
There’s something genuinely special about recreating a little bit of Disney magic at home—and these Disneyland Peanut Butter Squares deliver that perfect blend of nostalgia and pure dessert bliss. I hope you share these with friends, family, or just as a sweet pick-me-up all for yourself. Give them a try, and let a piece of the happiest place on earth brighten your kitchen!
Print
Disneyland Peanut Butter Squares Recipe
- Total Time: 2 hours 15 minutes
- Yield: 16 squares 1x
- Diet: Non-Vegetarian
Description
Indulge in the deliciousness of these Disneyland Peanut Butter Squares, a no-bake treat that combines creamy peanut butter with rich chocolate in every bite. Perfect for satisfying your sweet cravings!
Ingredients
Peanut Butter Layer:
- 1/2 cup unsalted butter, softened
- 1/2 cup creamy peanut butter
- 1 3/4 cups powdered sugar
- 1 cup graham cracker crumbs
- 1/2 tsp vanilla extract
Chocolate Topping:
- 1 1/2 cups milk chocolate chips
- 2 tbsp creamy peanut butter
Instructions
- Prepare Peanut Butter Layer: Line an 8×8-inch baking pan with parchment paper. Beat butter and peanut butter until smooth. Add powdered sugar, graham cracker crumbs, and vanilla extract. Mix well and press into pan.
- Make Chocolate Topping: Melt chocolate chips and peanut butter in the microwave, then spread over the peanut butter layer.
- Chill and Serve: Refrigerate for 2 hours, then slice into squares and enjoy chilled or at room temperature.
Notes
- Try using crunchy peanut butter or dark chocolate chips for variations.
- Store in the fridge for up to a week in an airtight container.
- Prep Time: 15 minutes
- Cook Time: 0 minutes
- Category: Dessert
- Method: No-Bake
- Cuisine: American
Nutrition
- Serving Size: 1 square
- Calories: 240
- Sugar: 20g
- Sodium: 85mg
- Fat: 15g
- Saturated Fat: 6g
- Unsaturated Fat: 8g
- Trans Fat: 0g
- Carbohydrates: 23g
- Fiber: 1g
- Protein: 4g
- Cholesterol: 15mg