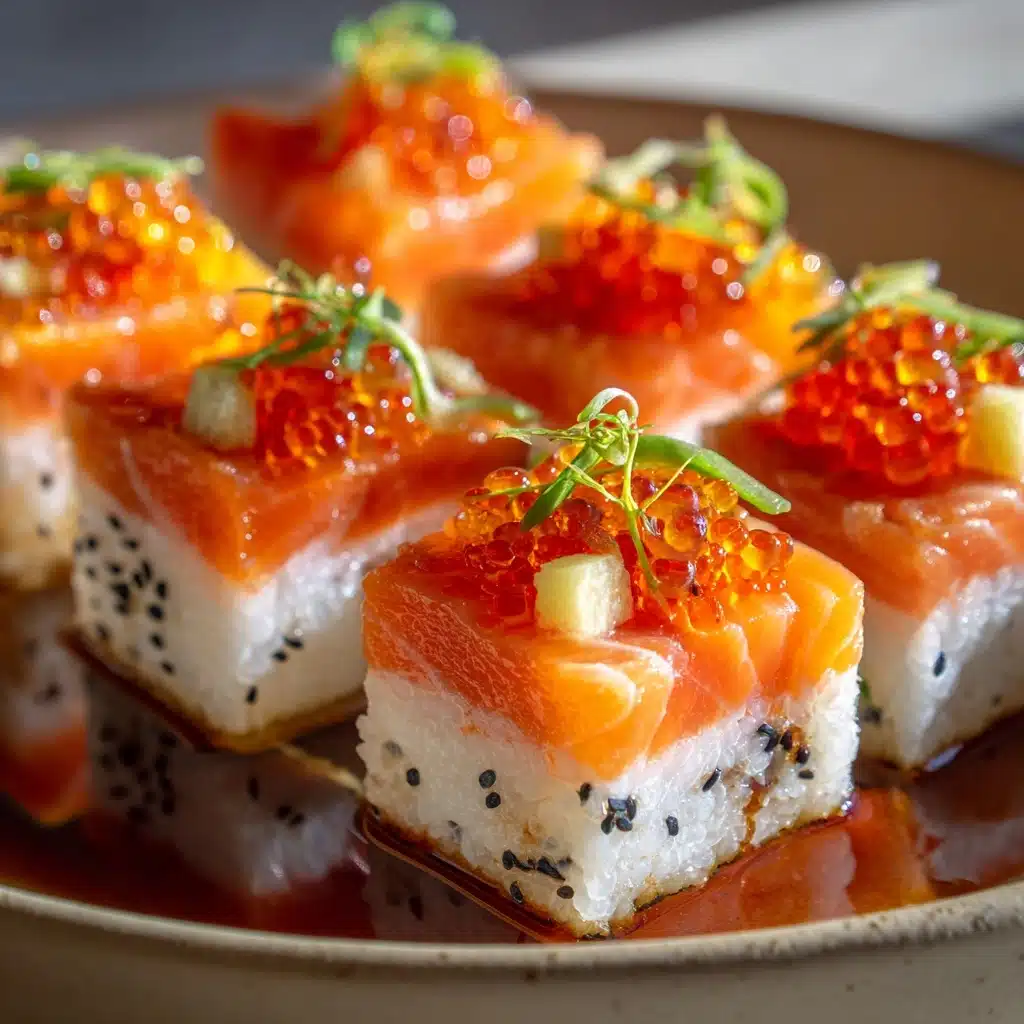
If you’re craving something irresistibly savory, creamy, and just a little bit indulgent, Baked Salmon Sushi is about to become your new obsession. Imagine warm, melt-in-your-mouth salmon, tangy sushi rice, and velvety cream cheese all wrapped in crisp nori and finished with a golden, bubbly top. This Japanese-inspired comfort food is everything you love about sushi rolls, but with a homey, oven-baked twist that brings out even more flavor and coziness. Whether you’re entertaining friends, treating yourself on a weeknight, or looking for a fun way to use up leftover salmon, Baked Salmon Sushi delivers a spectacular blend of taste and texture in every bite.
Ingredients You’ll Need
The magic of Baked Salmon Sushi starts with simple, high-quality ingredients that come together for a bold, satisfying dish. Each component plays an important role in creating layers of flavor, color, and texture—so don’t skip a thing!
- 2 cups cooked sushi rice: The sticky, seasoned base that holds everything together and soaks up all the delicious flavors.
- 2 tablespoons rice vinegar: Adds tang and brightness to the rice, balancing the richness of the filling.
- 1 tablespoon sugar: Rounds out the vinegar’s sharpness and gives the rice a subtle sweetness.
- 1/2 teaspoon salt: Essential for enhancing every flavor in the roll.
- 1 cup cooked salmon (flaked): The star of the show—use leftover grilled or roasted salmon for a shortcut!
- 1/2 cup cream cheese (softened): Brings a creamy, luscious texture to the filling that pairs perfectly with salmon.
- 1/4 cup Japanese mayonnaise (or regular mayo): Adds tangy richness and helps create that signature creamy salmon mixture.
- 1 tablespoon sriracha (optional): For a gentle kick of heat—adjust to your spice preference.
- 1/2 avocado (sliced): Creamy, fresh, and visually stunning inside each roll.
- 1/2 cucumber (julienned): Adds crunch and a refreshing bite to balance the richness.
- 4 sheets nori (seaweed): The classic sushi wrapper, bringing a subtle ocean flavor and crisp texture after baking.
- Sesame seeds (for garnish): A nutty crunch and beautiful finishing touch.
- Green onions (sliced, for garnish): Fresh, mild onion flavor and a pop of color.
- Soy sauce, pickled ginger, and wasabi (for serving): Essential sushi accompaniments for dipping and extra zing.
How to Make Baked Salmon Sushi
Step 1: Season the Sushi Rice
Start by making your seasoned sushi rice—this is what gives Baked Salmon Sushi that unmistakable sweet-and-sour backbone. In a small bowl, mix the rice vinegar, sugar, and salt, then microwave for about 15 to 20 seconds to help the sugar dissolve. Pour this over your warm, freshly cooked rice and gently fold everything together. Let the rice cool to room temperature so it’s easy to handle and won’t steam your nori.
Step 2: Prepare the Salmon Filling
While the rice cools, combine your flaked cooked salmon with the softened cream cheese, mayonnaise, and a little sriracha if you want some gentle heat. Mix until everything is creamy and the salmon is well distributed. This dreamy filling is the heart of your Baked Salmon Sushi—rich, savory, and just a little bit tangy.
Step 3: Assemble the Rolls
Preheat your oven to 375°F (190°C). Lay out your nori sheets, shiny side down, on a flat surface or bamboo sushi mat if you have one. With damp hands, spread a thin, even layer of seasoned rice over each nori sheet, pressing gently to avoid tearing. Near the bottom edge, add a line of cucumber and avocado, then top with a generous spoonful of the salmon mixture. Carefully roll everything up tightly—don’t worry if it’s not perfect, it will taste amazing!
Step 4: Bake the Sushi Rolls
Place your assembled rolls seam-side down on a parchment-lined baking sheet. Pop them in the preheated oven and bake for 10 to 12 minutes, just until the rolls are warmed through and the creamy filling is starting to bubble. This is where the magic of Baked Salmon Sushi happens—the flavors meld, the nori crisps up, and your kitchen starts to smell incredible.
Step 5: Slice and Garnish
Remove the rolls from the oven and let them cool for a couple of minutes so they’re easier to handle. Using a sharp knife (wiped clean between cuts), slice each roll into 6 to 8 pieces. Sprinkle with sesame seeds and sliced green onions for a pop of color and crunch. Get your soy sauce, pickled ginger, and wasabi ready for dipping and savor every bite!
How to Serve Baked Salmon Sushi

Garnishes
A sprinkle of sesame seeds and a handful of sliced green onions are the classic finishing touches for Baked Salmon Sushi. They not only add visual appeal but also bring a subtle crunch and fresh, herby flavor that livens up each piece. If you’re feeling adventurous, a drizzle of extra sriracha or a touch of spicy mayo on top makes things extra delicious.
Side Dishes
Pair your warm Baked Salmon Sushi with a crisp seaweed salad, a bowl of miso soup, or even some simple steamed edamame for a balanced meal. These sides keep things light and refreshing, playing off the richness of the baked sushi without overpowering it.
Creative Ways to Present
For a fun twist, arrange your sushi pieces on a platter in a spiral or rainbow pattern, alternating with slices of avocado or cucumber for a pop of color. Mini sushi towers or a family-style sushi bake in a casserole dish (think deconstructed sushi!) are also crowd-pleasers and perfect for potlucks or casual get-togethers.
Make Ahead and Storage
Storing Leftovers
If you have leftover Baked Salmon Sushi, store it in an airtight container in the refrigerator for up to two days. The rice may firm up slightly, but the creamy filling will keep the rolls moist and flavorful. Enjoy them cold or give them a quick reheat to bring back that just-baked magic.
Freezing
While you can technically freeze Baked Salmon Sushi, the texture of the rice and avocado may change a bit after thawing. If freezing, wrap the rolls tightly in plastic wrap and store in a freezer-safe bag for up to one month. Thaw overnight in the fridge before reheating.
Reheating
To reheat, place sushi pieces on a parchment-lined baking sheet and warm in a 300°F (150°C) oven for about 8 to 10 minutes, or until heated through. This helps restore the creamy texture of the filling and revives the nori’s slight crispness. Avoid microwaving if possible, as it can make the nori chewy.
FAQs
Can I use canned salmon for Baked Salmon Sushi?
Absolutely! Canned salmon is a great shortcut and works wonderfully in this recipe. Just be sure to drain it well and remove any bones or skin before mixing it with the other filling ingredients.
Is there a substitute for Japanese mayonnaise?
Yes, regular mayonnaise works just fine, but if you want that signature sweet-tangy flavor, add a tiny splash of rice vinegar and a sprinkle of sugar to your mayo before mixing it into the salmon.
Can I make Baked Salmon Sushi gluten free?
Definitely—just use gluten-free soy sauce for serving and double-check that your nori and any other condiments are certified gluten-free. All the main ingredients in the rolls are naturally gluten free.
What’s the best way to slice the rolls cleanly?
Use a very sharp knife and dip it in water or wipe it with a damp towel between each cut. This prevents the rice and filling from sticking and gives you neat, restaurant-quality slices.
Can I add other vegetables or toppings?
Of course! Feel free to add thin strips of bell pepper, carrots, or even a sprinkle of panko breadcrumbs on top before baking for extra crunch. Baked Salmon Sushi is super customizable—make it your own!
Final Thoughts
There’s something so comforting and fun about making Baked Salmon Sushi at home, and I hope you feel inspired to give it a try. It’s a playful, crowd-pleasing dish that never fails to impress, whether you’re a sushi lover or just looking for something new and delicious. Gather your ingredients, roll up your sleeves, and get ready to enjoy a warm, crave-worthy spin on sushi night!
Print
Baked Salmon Sushi Recipe
- Total Time: 32 minutes
- Yield: 4 rolls (32 pieces) 1x
- Diet: Non-Vegetarian
Description
This Baked Salmon Sushi recipe offers a delightful twist on traditional sushi by combining creamy salmon filling with seasoned sushi rice, then oven-baking the rolls for a warm, flavorful experience. Perfect as a main course or appetizer, the recipe balances creamy textures with fresh cucumber and avocado, garnished with sesame seeds and green onions.
Ingredients
Sushi Rice
- 2 cups cooked sushi rice
- 2 tablespoons rice vinegar
- 1 tablespoon sugar
- 1/2 teaspoon salt
Salmon Filling
- 1 cup cooked salmon, flaked
- 1/2 cup cream cheese, softened
- 1/4 cup Japanese mayonnaise (or regular mayo)
- 1 tablespoon sriracha (optional)
Fresh Ingredients
- 1/2 avocado, sliced
- 1/2 cucumber, julienned
Assembly & Garnish
- 4 sheets nori (seaweed)
- Sesame seeds, for garnish
- Green onions, sliced, for garnish
- Soy sauce, for serving
- Pickled ginger, for serving
- Wasabi, for serving
Instructions
- Prepare Seasoned Sushi Rice: In a small bowl, combine the rice vinegar, sugar, and salt. Microwave for 15–20 seconds to help dissolve the sugar and salt, then stir until fully combined. Pour this mixture over the warm cooked sushi rice and gently fold to incorporate evenly. Allow the rice to cool to room temperature.
- Make Salmon Cream Cheese Filling: In another bowl, combine the flaked cooked salmon with the softened cream cheese, Japanese mayonnaise, and sriracha if using. Mix thoroughly until the filling is smooth and creamy.
- Assemble Sushi Rolls: Preheat your oven to 375°F (190°C). Lay out the nori sheets flat on a clean surface. Spread a thin and even layer of the seasoned sushi rice over each nori sheet, pressing gently to adhere. Place a line of julienned cucumber and sliced avocado near the bottom edge, followed by a generous spoonful of the salmon mixture. Roll the sushi tightly using a bamboo sushi mat or your hands, ensuring the roll is firm and sealed.
- Bake the Rolls: Place the sushi rolls seam-side down on a parchment-lined baking sheet. Bake in the preheated oven for 10–12 minutes, until the rolls are warmed through and the salmon filling is slightly bubbly. Once done, remove from the oven and let them cool for 2–3 minutes before slicing.
- Slice and Garnish: Using a sharp knife, slice each roll into 6–8 pieces. Garnish with a sprinkle of sesame seeds and sliced green onions. Serve the baked salmon sushi with soy sauce, pickled ginger, and wasabi for dipping and added flavor.
Notes
- Utilize leftover grilled or roasted salmon to save time and add smoky flavor.
- For added texture, sprinkle panko breadcrumbs on top of the rolls before baking.
- If you prefer a milder flavor, omit the sriracha or adjust to taste.
- Ensure the sushi rice is just warm and not hot when assembling to avoid tearing the nori sheets.
- Use a very sharp knife to slice the sushi rolls cleanly and maintain the shape of the pieces.
- Prep Time: 20 minutes
- Cook Time: 12 minutes
- Category: Main Course, Appetizer
- Method: Baking
- Cuisine: Japanese-Inspired
Nutrition
- Serving Size: 1 roll (8 pieces)
- Calories: 360
- Sugar: 4 g
- Sodium: 520 mg
- Fat: 18 g
- Saturated Fat: 6 g
- Unsaturated Fat: 10 g
- Trans Fat: 0 g
- Carbohydrates: 34 g
- Fiber: 2 g
- Protein: 16 g
- Cholesterol: 45 mg