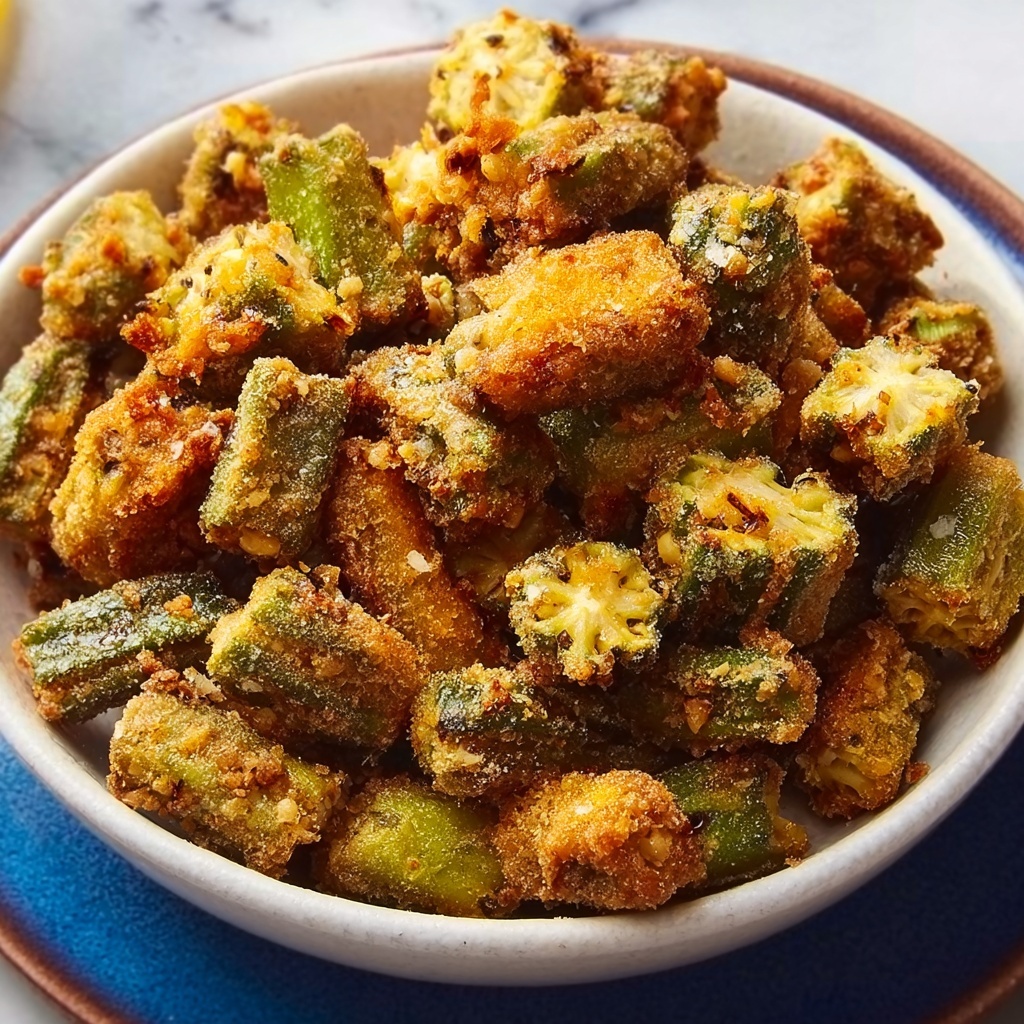
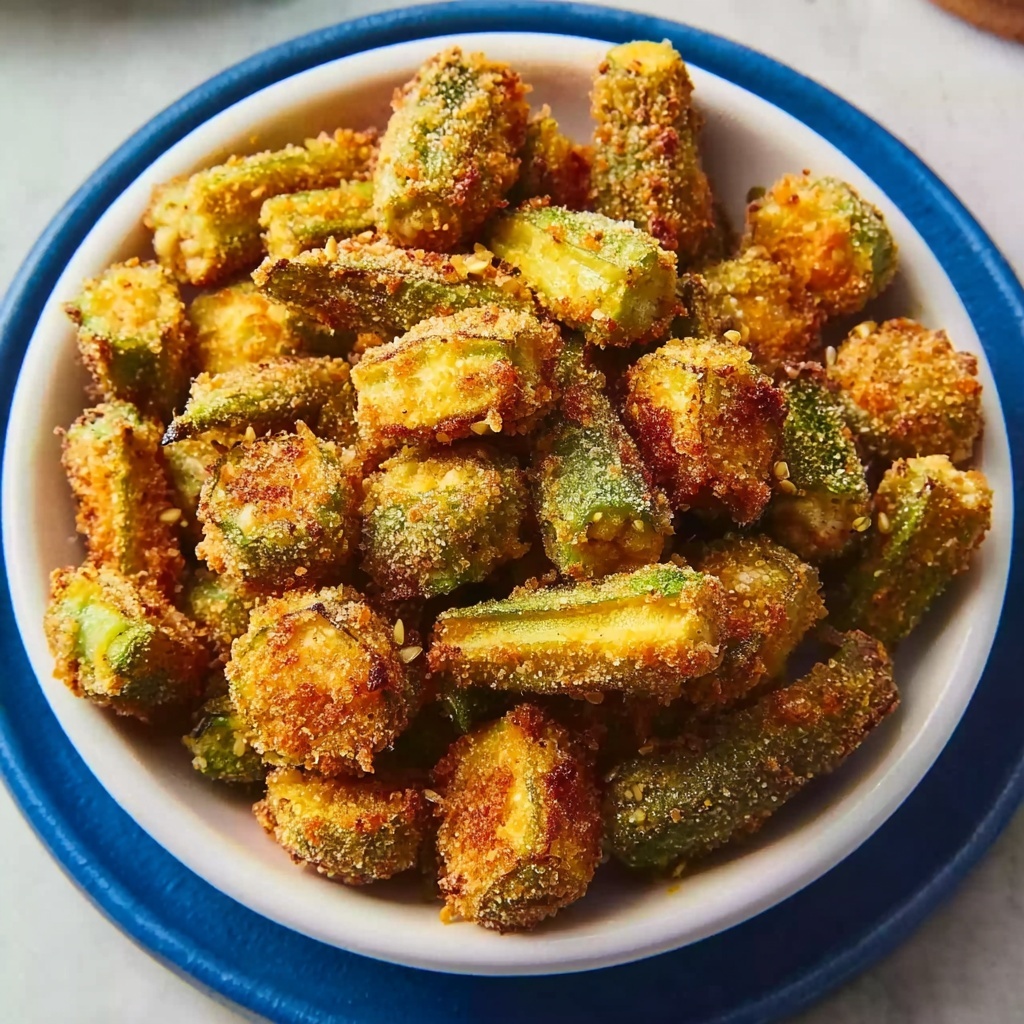
If you’ve never experienced the delight of crispy, tangy, and irresistibly crunchy Southern soul food, then this Fried Pickled Okra Recipe is about to become your new favorite comfort snack. Combining the zesty snap of pickled okra with a perfectly seasoned, crunchy coating, every bite bursts with bold flavor and satisfying texture that’s hard to forget. Whether you’re sharing with friends or enjoying a cozy solo treat, this dish brings a lively twist to classic fried favorites that feels like a warm hug from the South.
Ingredients You’ll Need
This Fried Pickled Okra Recipe keeps things wonderfully simple with pantry-friendly ingredients you likely already have. Each plays a crucial role — from adding crispness and golden color to delivering that perfect savory punch.
- Vegetable or peanut oil: Use about 2 inches depth for frying to achieve that classic crispy texture without greasiness.
- Pickled okra (16-oz jar): The star of the show, offering a delightful tang and crunch.
- All-purpose flour: Divided into two portions, it creates the foundation for the crispy coating.
- Whole buttermilk: Tenderizes the okra coating and adds subtle richness.
- Large egg: Helps bind the coating for that even, golden crust.
- Yellow cornmeal: For that unmistakable Southern grit and crunch in every bite.
- Kosher salt: Divided seasoning to enhance flavor both in and on the okra.
- Baking powder: Adds lightness to the coating, preventing it from becoming dense or heavy.
- Garlic powder: Infuses a gentle savory note balancing the tang of the pickled okra perfectly.
How to Make Fried Pickled Okra Recipe
Step 1: Prepare Your Frying Oil
Start by heating about 2 inches of vegetable or peanut oil in a Dutch oven or a deep, heavy pot. Your goal is to reach a temperature of 350 °F (175 °C) — the sweet spot for that irresistible fried crunch. Heating the oil properly ensures the okra fries evenly without soaking up excess oil.
Step 2: Slice and Dry the Pickled Okra
Open your jar of pickled okra and drain it thoroughly. Slice each piece lengthwise to maximize surface area for crispiness. After slicing, pat the okra dry with paper towels to remove any excess moisture. This step is essential so the coating sticks well and fries up beautifully crispy.
Step 3: Set Up Your Dredging Stations
Organize three bowls for an easy and effective breading process. Place ½ cup of flour in the first bowl for initial coating. In the second, whisk together the whole buttermilk and beaten egg — this rich mixture helps the coating adhere flawlessly. In the third bowl, combine the remaining ¾ cup of flour with yellow cornmeal, 1 teaspoon of salt, baking powder, and garlic powder to create the flavorful final crust.
Step 4: Coat the Okra
One at a time, dredge each slice of okra first in the plain flour, then dip it into the buttermilk-egg mixture, and finally roll it in the cornmeal mixture. Make sure every piece is fully coated for maximum crunch and flavor. This three-stage breading locks in moisture and delivers that perfect golden crust everyone loves in a Fried Pickled Okra Recipe.
Step 5: Fry Until Golden and Crispy
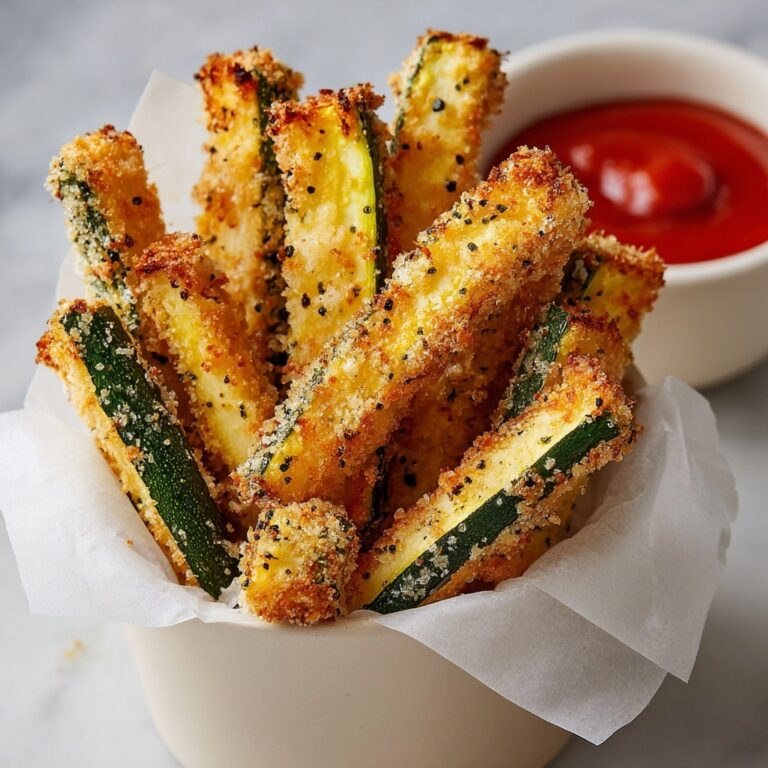
Carefully place the coated okra slices in batches into the hot oil. Fry them for about 2 to 3 minutes, turning occasionally so they brown evenly. Keep an eye on your oil temperature — let it recover between batches to maintain the ideal frying environment. The end result? Golden, crunchy bites with an addictive tang.
Step 6: Drain and Season
Once fried, transfer the okra to a paper towel-lined plate to drain excess oil. While still hot, sprinkle the remaining ½ teaspoon of kosher salt over the top to enhance the flavors just before serving. The salt adds that finishing touch, making this Fried Pickled Okra Recipe utterly irresistible.
How to Serve Fried Pickled Okra Recipe

Garnishes
To elevate your presentation and taste even further, consider adding a sprinkle of fresh chopped parsley or a light dusting of smoked paprika. These touches add color contrast and a subtle fresh or smoky note that complements the dish beautifully.
Side Dishes
Fried pickled okra pairs wonderfully with hearty Southern staples like creamy coleslaw, buttery cornbread, or even a refreshing cucumber salad. Its tangy crunch balances rich sides, making your meal perfectly rounded and satisfying.
Creative Ways to Present
For a fun twist, serve your fried okra skewered as finger-friendly appetizers at your next gathering or pile it atop a tossed green salad to add texture and zest. You could also offer a variety of dipping sauces such as spicy ranch, garlic aioli, or honey mustard for an interactive and tasty experience.
Make Ahead and Storage
Storing Leftovers
If you have leftovers from your Fried Pickled Okra Recipe, place them in an airtight container lined with paper towels to absorb moisture. They will stay fresh in the refrigerator for up to 2 days, just remember the crunch will diminish over time.
Freezing
While fried okra is best enjoyed fresh, you can freeze leftovers. Spread the fried slices on a baking sheet to freeze individually before transferring to a freezer-safe container. This prevents clumping, allowing you to reheat only what you need with less loss of texture.
Reheating
To bring back the crispiness, reheat leftover okra on a wire rack in a preheated oven at 375 °F (190 °C) for about 8 to 10 minutes instead of microwaving. This method refreshes the crunch without making the coating soggy.
FAQs
Can I use fresh okra instead of pickled for this recipe?
You can, but the unique tang and flavor come from using pickled okra. Fresh okra will fry well but lacks that delightful pickled punch that defines this recipe.
What type of oil is best for frying okra?
Vegetable and peanut oils are ideal because they have high smoke points and neutral flavors, ensuring the okra fries evenly without burning or tasting oily.
Is it necessary to slice the okra lengthwise?
Slicing lengthwise increases the surface area, helping the coating adhere better and creating a more satisfying crunch in every bite compared to frying whole okra pods.
Can I make the batter gluten-free?
Absolutely! Substitute all-purpose flour with gluten-free flour blends and use gluten-free cornmeal. Just be sure the pickled okra and other ingredients are gluten-free as well.
How do I prevent the coating from falling off when frying?
Dry the okra thoroughly and follow the three-stage dredging process carefully — flour first, then egg mixture, then cornmeal mixture. Also, fry in batches without overcrowding the pot to maintain oil temperature and keep the coating intact.
Final Thoughts
This Fried Pickled Okra Recipe is a game changer when you want a snack or side that’s bursting with Southern charm and bold flavor. It’s simple to make but impressive in taste and texture. I can’t recommend it enough for your next gathering or cozy night in. Grab that jar of pickled okra and give this recipe a try — your taste buds will thank you!
Print
Fried Pickled Okra Recipe
- Prep Time: 10 minutes
- Cook Time: 20 minutes
- Total Time: 30 minutes
- Yield: 8 servings
- Category: Appetizer
- Method: Frying
- Cuisine: Southern
Description
Crispy and flavorful Fried Pickled Okra is a Southern-inspired appetizer featuring tangy pickled okra slices coated in a seasoned cornmeal and flour batter, then fried to golden perfection. This easy-to-make recipe delivers a crunchy, savory snack that’s perfect for sharing and enjoying warm.
Ingredients
For Frying
- Vegetable or peanut oil (for frying, about 2 inches depth)
Pickled Okra Preparation
- 1 (16‑oz) jar pickled okra, drained and sliced lengthwise
Breading Mixture
- 1¼ cups all‑purpose flour, divided
- 1 Tbsp whole buttermilk
- 1 large egg, lightly beaten
- ½ cup yellow cornmeal
- 1½ tsp kosher salt (divided)
- ¾ tsp baking powder
- ¾ tsp garlic powder
Instructions
- Heat the oil: Pour about 2 inches of vegetable or peanut oil into a Dutch oven or heavy pot and heat over medium until the oil reaches 350 °F (175 °C). This temperature is essential for achieving a crispy coating.
- Prepare the okra: Drain the pickled okra and slice each pod lengthwise. Pat the slices thoroughly dry with paper towels to ensure the coating adheres properly.
- Set up dredging stations: Arrange three bowls: (a) ½ cup flour; (b) whisk together the buttermilk and beaten egg; and (c) mix the remaining ¾ cup flour, yellow cornmeal, 1 teaspoon kosher salt, baking powder, and garlic powder.
- Coat the okra: Dredge each okra slice first in the flour (a), then dip into the egg and buttermilk mixture (b), and finally coat with the cornmeal mixture (c), making sure each piece is fully covered for maximum crunch.
- Fry the okra: Carefully place coated okra pieces into the hot oil in batches. Fry for 2 to 3 minutes, turning occasionally, until golden brown and crispy. Allow the oil to return to 350 °F between batches for consistent results.
- Drain and season: Remove the fried okra with a slotted spoon and place on paper towels to drain excess oil. Immediately sprinkle with the remaining ½ teaspoon kosher salt while still warm. Serve immediately for best taste and texture.
Notes
- Ensure the oil is at the correct frying temperature to avoid greasy or soggy okra.
- Patting the pickled okra dry is crucial to prevent splattering and help the coating stick better.
- Use peanut oil for a slightly nuttier flavor; vegetable oil works just as well.
- If preferred, you can substitute buttermilk with regular milk mixed with 1 teaspoon lemon juice or vinegar.
- Serve with your favorite dipping sauce for an extra burst of flavor.

