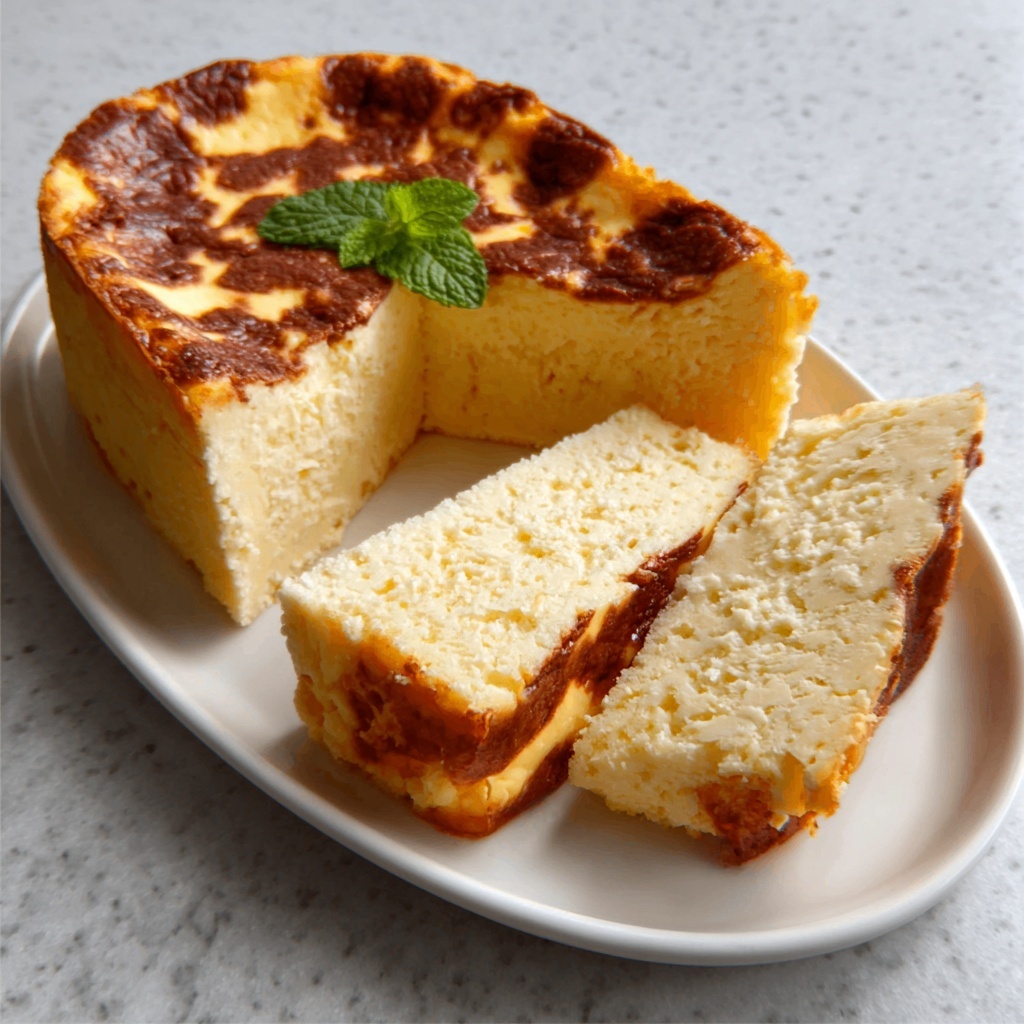
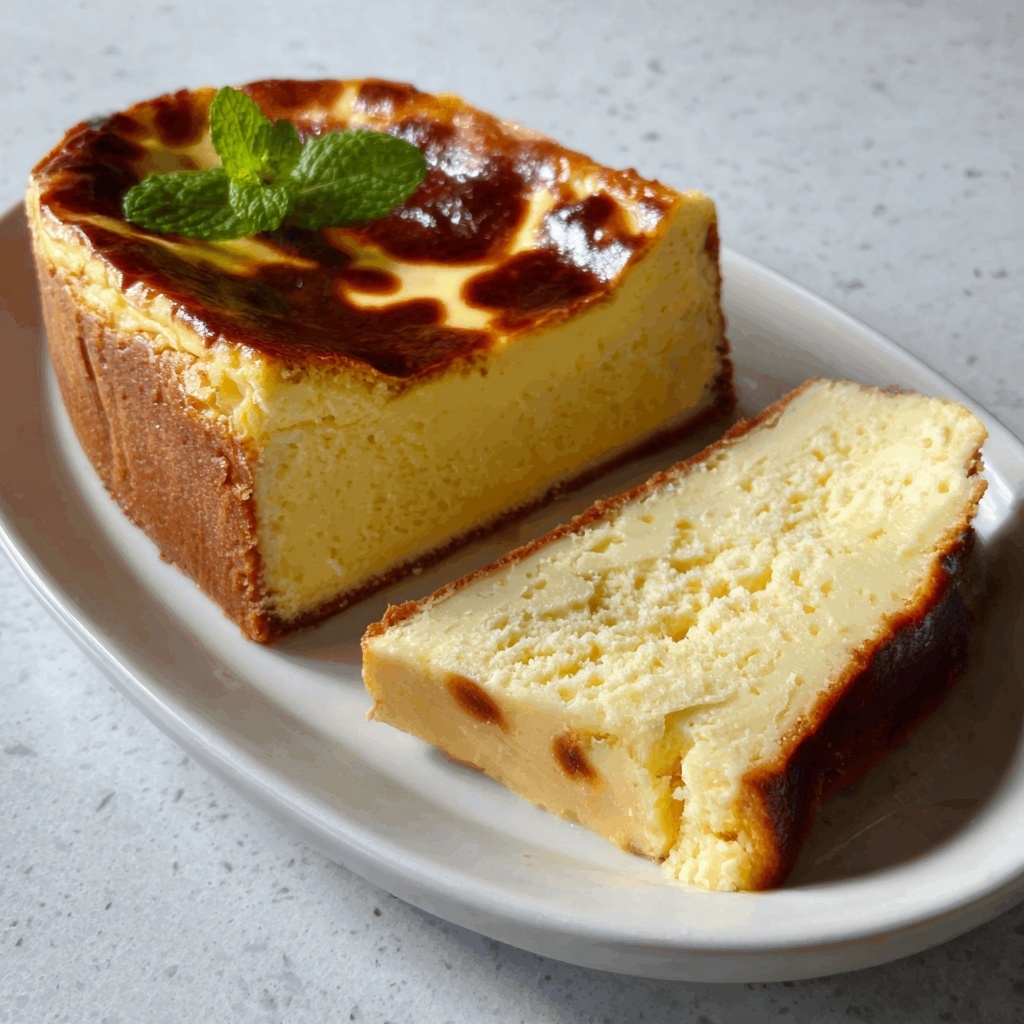
If you’re craving a dessert that feels like a warm hug wrapped in silky smoothness, this Loaf Pan Basque Cheesecake: A Simple, Creamy Delight Recipe is here to steal your heart. With just a handful of everyday ingredients, it transforms into a golden-topped, custardy center cheesecake that melts in your mouth and leaves you smiling after each bite. Perfectly rustic yet decadently creamy, this bake strikes the ideal balance between simplicity and indulgence, making it a must-try for cheesecake lovers and baking beginners alike.
Ingredients You’ll Need
These ingredients are wonderfully straightforward but each plays an essential role for that perfect creamy texture, rich flavor, and beautiful golden finish. As you gather them, you’ll appreciate how their harmony creates a truly special Basque cheesecake experience.
- Cream cheese (2 cups, softened): The star of the show, providing that luxurious, creamy base every bite depends on.
- Granulated sugar (1 cup): Adds just the right amount of sweetness to balance the tanginess of the cream cheese.
- Vanilla extract (1 teaspoon): Brings a warm, fragrant undertone that elevates the entire flavor profile.
- Salt (1/4 teaspoon): Enhances all the flavors and keeps the sweetness from becoming one-dimensional.
- Eggs (3 large): Gives structure and richness, ensuring the cheesecake sets beautifully without cracking.
- Heavy cream (1 cup): Adds extra creaminess and smoothness that makes the texture so irresistible.
- All-purpose flour (1/4 cup): Just enough to provide a gentle lift and a slightly custardy finish.
How to Make Loaf Pan Basque Cheesecake: A Simple, Creamy Delight Recipe
Step 1: Prepare Your Pan and Preheat
Start by setting your oven to a high temperature of 400°F (200°C). Line a 9×5 inch loaf pan with parchment paper, making sure the sides are well covered because this cheesecake is going to puff up and develop a luscious browned crust that needs to easily lift out later.
Step 2: Whip Up the Cream Cheese
In a large bowl, use an electric mixer to whip the softened cream cheese until it’s silky smooth and free of lumps. This step is crucial for that perfect creamy texture in the final cheesecake.
Step 3: Sweeten and Flavor
Gradually add the granulated sugar to the cream cheese while continuing to beat. Then, mix in the vanilla extract and a pinch of salt to deepen the flavor. Your base is starting to come alive with sweetness and warmth now.
Step 4: Incorporate the Eggs
Add the eggs one at a time, making sure each is fully blended before adding the next. This patient mixing helps the cheesecake develop that silky, custardy interior without overworking the batter.
Step 5: Blend in Cream and Flour
Slowly pour in the heavy cream and mix until the batter looks luscious and smooth. Finally, sift the flour over the mixture and gently fold it in with a spatula—be careful not to deflate all the air you’ve worked into the batter.
Step 6: Bake to Golden Perfection
Pour the batter into your prepared loaf pan and smooth out the top. Bake for 40 to 45 minutes. You’ll know it’s done when the surface turns a gorgeous golden brown and the center still jiggles just slightly—this makes it wonderfully creamy inside.
Step 7: Cool and Chill
Let the cheesecake cool in the pan for about 30 minutes to set up gently. Then pop it in the fridge for at least 4 hours or, even better, overnight. This resting time allows the flavors to marry and the texture to firm up beautifully.
Step 8: Enjoy Your Masterpiece
Carefully lift the cheesecake from the pan using the parchment paper edges, slice it up, and get ready to indulge in a bite of the dreamy Loaf Pan Basque Cheesecake: A Simple, Creamy Delight Recipe you just created.
How to Serve Loaf Pan Basque Cheesecake: A Simple, Creamy Delight Recipe

Garnishes
This cheesecake shines on its own, but a light dusting of powdered sugar or fresh berries adds a lovely touch of elegance and color contrast. You can also drizzle a little honey or berry compote over the slices for fruity brightness that complements the creamy richness.
Side Dishes
Serve alongside a cup of strong coffee or a floral tea to balance the richness of the cheesecake. For a fresh twist, try pairing it with a small salad of seasonal fruits—something tart like pomegranate arils or citrus segments creates a vibrant flavor dance.
Creative Ways to Present
For a special occasion, serve individual slices on pretty plates topped with a dollop of whipped cream and edible flowers. If you want a crowd-pleaser, arrange sliced cheesecake on a wooden board with assorted nuts and fruit preserves, encouraging everyone to mix and match their perfect bites.
Make Ahead and Storage
Storing Leftovers
Store any leftover Loaf Pan Basque Cheesecake: A Simple, Creamy Delight Recipe covered in the fridge for up to 4 days. Keeping it tightly wrapped prevents it from drying out and helps maintain that creamy texture you love.
Freezing
You can freeze the cheesecake in individual slices wrapped tightly in plastic wrap and foil, which keeps them fresh for up to 2 months. Thaw overnight in the fridge before serving to enjoy the perfect consistency.
Reheating
This cheesecake is best served chilled, but if you prefer it slightly warmed, let slices sit at room temperature for 15 minutes or gently warm them in a low oven for 5 minutes. Avoid the microwave to preserve the texture and prevent curdling.
FAQs
Can I use a different pan instead of a loaf pan?
Absolutely! While a loaf pan gives this cheesecake its characteristic shape, you can also use a springform or pie dish. Just keep an eye on the baking time as it may vary slightly depending on pan size.
Why does the cheesecake have a browned top?
The signature browned top comes from baking at a high temperature, which caramelizes the sugars in the batter and adds a lovely depth of flavor and a slightly smoky note. It’s what makes this recipe uniquely delicious.
Is it necessary to refrigerate the cheesecake overnight?
Refrigerating overnight is highly recommended because it allows the cheesecake to set completely and the flavors to deepen, giving you the best creamy texture and taste experience.
Can I substitute heavy cream with something else?
Heavy cream provides richness and texture that’s hard to replicate, but whole milk or half-and-half can work in a pinch. The cheesecake may be a bit less creamy but will still be tasty.
How do I prevent the cheesecake from cracking?
This recipe’s high cream cheese and careful mixing help minimize cracking. Also, avoid overbaking and gently fold in ingredients rather than vigorous beating to keep a smooth, crack-free surface.
Final Thoughts
I can’t wait for you to try this Loaf Pan Basque Cheesecake: A Simple, Creamy Delight Recipe and see how the magic unfolds in your own kitchen. Its easy prep combined with that crave-worthy texture truly makes it one of my favorite desserts to share with friends and family. Once you taste that luscious, creamy center and caramelized top, you’ll be hooked just like I am!
Print
Loaf Pan Basque Cheesecake: A Simple, Creamy Delight Recipe
- Prep Time: 15 minutes
- Cook Time: 45 minutes
- Total Time: 4 hours 60 minutes (4 hours chilling plus prep and bake time)
- Yield: 8 servings
- Category: Dessert
- Method: Baking
- Cuisine: Basque / Spanish
- Diet: Vegetarian
Description
This Loaf Pan Basque Cheesecake is a simple and creamy dessert featuring a beautifully caramelized top with a soft, custardy interior. Baked in a loaf pan and chilled to perfection, it offers an elegant twist on the classic Basque-style cheesecake that’s perfect for any occasion.
Ingredients
Cheesecake Base
- 2 cups cream cheese, softened
- 1 cup granulated sugar
- 1 teaspoon vanilla extract
- 1/4 teaspoon salt
- 3 large eggs
- 1 cup heavy cream
- 1/4 cup all-purpose flour
Instructions
- Preheat and Prepare Pan: Preheat your oven to 400°F (200°C) and line a 9×5 inch loaf pan with parchment paper, allowing some overhang for easy removal later.
- Beat Cream Cheese: In a large bowl, whip the softened cream cheese with an electric mixer until silky and smooth, ensuring there are no lumps.
- Add Sugar: Gradually add the granulated sugar to the cream cheese, beating continuously until well combined and creamy.
- Incorporate Flavorings: Mix in the vanilla extract and salt until the mixture is uniformly blended.
- Add Eggs: Add the eggs one at a time, mixing thoroughly after each to create a smooth batter.
- Blend Heavy Cream: Slowly pour in the heavy cream while continuing to mix until the batter is smooth and creamy.
- Fold in Flour: Sift the all-purpose flour over the batter and gently fold it in with a spatula to avoid overmixing.
- Pour Batter: Transfer the batter into the prepared loaf pan and smooth the top evenly with a spatula.
- Bake: Bake in the preheated oven for 40-45 minutes until the surface is golden brown and slightly cracked, with the center still jiggly when gently shaken.
- Cool: Allow the cheesecake to cool in the pan for 30 minutes to set.
- Chill: Refrigerate the cheesecake in the same pan for at least 4 hours or preferably overnight to fully develop the creamy texture.
- Serve: Use the parchment paper overhang to lift the cheesecake out of the pan, slice, and enjoy this luscious Basque-inspired treat.
Notes
- Make sure the cream cheese is at room temperature to avoid lumps in the batter.
- Do not overbake; the center should still jiggle slightly to maintain the creamy texture.
- Allow adequate chilling time for the best texture and flavor.
- Parchment paper lining ensures easy removal and clean edges.
- This cheesecake is best enjoyed within 2-3 days when stored in the refrigerator.


