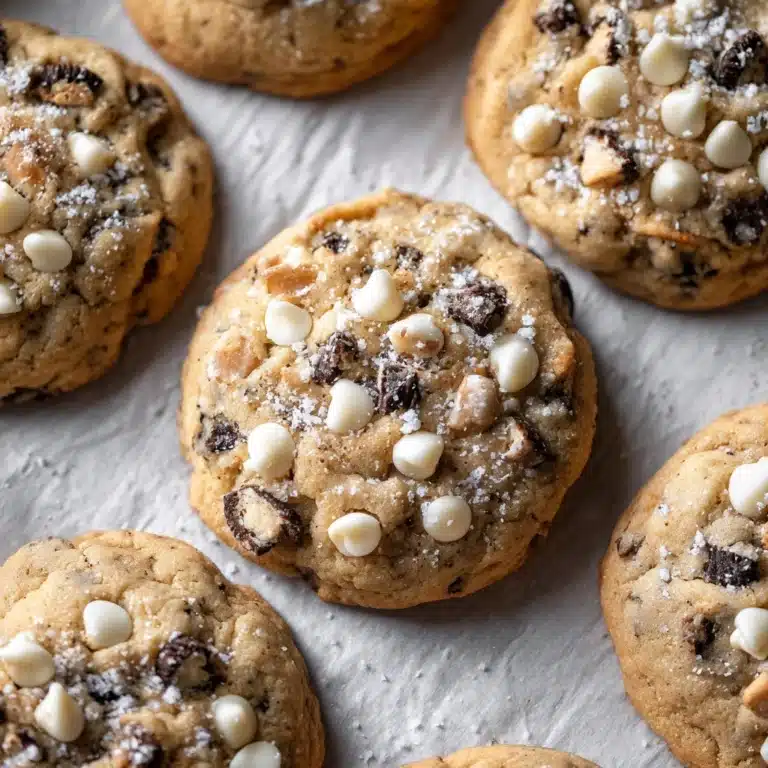
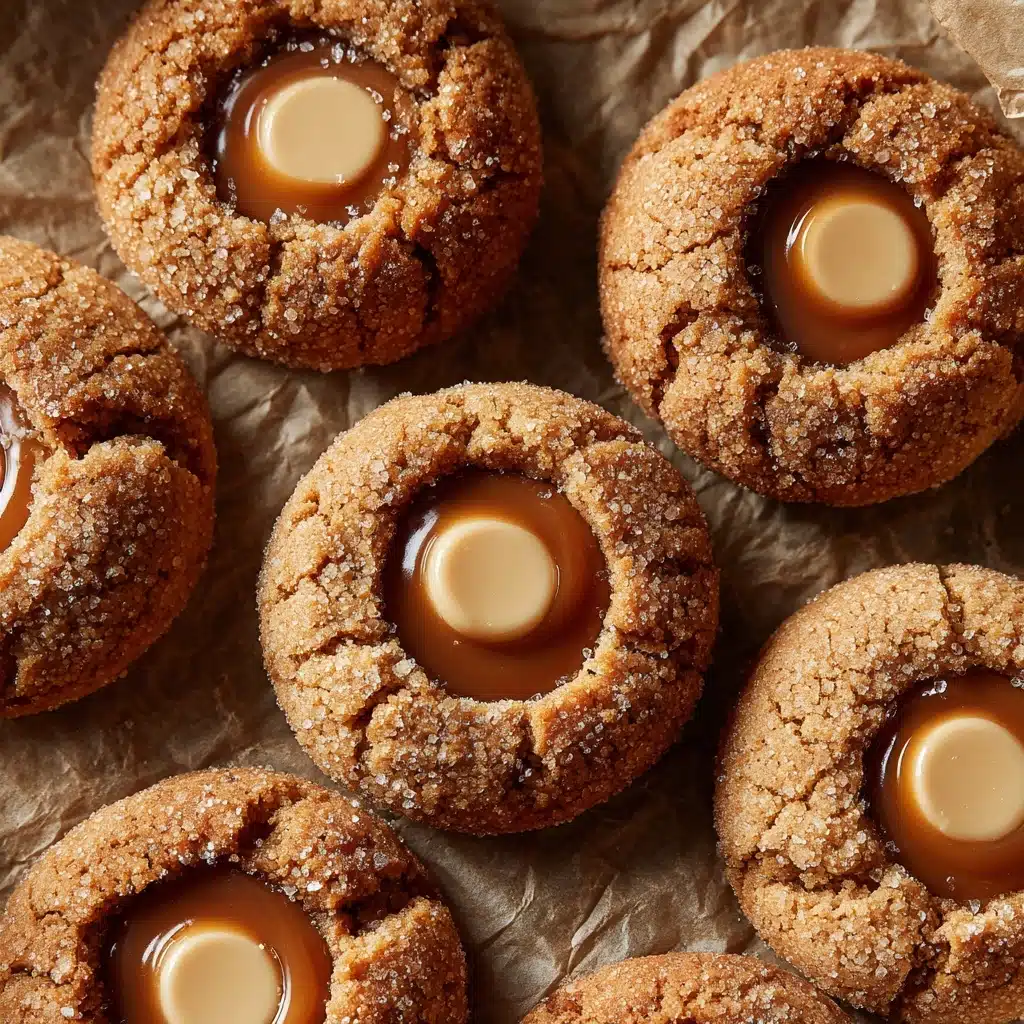
If you’re in the mood for the sweet, cinnamony magic of snickerdoodles and the creamy indulgence of thumbprint cookies, get ready to meet your new favorite treat: Snickerdoodle Thumbprint Cookies. These little gems combine pillowy, buttery cookies rolled in cinnamon sugar, each one cradling a luscious cream cheese center. Every bite brings a harmony of cozy spice and rich filling, making these cookies impossible to stop at just one. Whether you’re baking for a festive gathering, a family treat, or just to pamper yourself, Snickerdoodle Thumbprint Cookies are guaranteed to steal the show.

Ingredients You’ll Need
Simplicity is what makes these cookies shine. Each ingredient has its special role, coming together to create warm flavors, soft texture, and that signature cinnamon sparkle.
- Unsalted Butter: Softened butter is key for that tender, melt-in-your-mouth texture.
- Granulated Sugar: This not only sweetens the dough but also gives the perfect crisp exterior when combined with cinnamon.
- Egg: One egg brings everything together and adds a little richness.
- Vanilla Extract: Fragrant, pure vanilla ties all the warm flavors together.
- All-Purpose Flour: Provides the structure for that classic cookie bite.
- Baking Powder: Lifts the cookies just enough for a soft, fluffy middle.
- Salt: Just a pinch amplifies every other flavor.
- Granulated Sugar (for rolling): Adds sparkle and sweet crunch after being mixed with cinnamon.
- Ground Cinnamon: The star of the cookie coating, essential for that snickerdoodle character.
- Cream Cheese: Softened cream cheese creates a tangy, dreamy filling for the thumbprints.
- Powdered Sugar: Sweetens the cream cheese without making it grainy.
- Vanilla Extract (for filling): Injects a cozy warmth into the creamy center.
- Optional: Caramel Sauce or Fruit Preserves: Add a surprise on top with a drizzle or dollop for extra delight.
How to Make Snickerdoodle Thumbprint Cookies
Step 1: Prep Your Baking Sheet
Begin by preheating your oven to 350°F (175°C) so it’s perfectly hot when your cookies are ready to bake. Line a large baking sheet with parchment paper to be sure your Snickerdoodle Thumbprint Cookies release easily and get that just-right golden edge.
Step 2: Cream the Butter and Sugar
In a large bowl, beat the softened butter with 1 cup of granulated sugar until it’s pale, fluffy, and begging to be tasted. This is your foundation for tender cookies, and taking the time to cream it well makes all the difference!
Step 3: Blend in the Egg and Vanilla
Add the egg and 1 teaspoon of vanilla extract to your butter mixture, beating until the mixture is smooth and a little glossy. This step brings moisture and flavor, infusing your dough with warmth and richness.
Step 4: Combine the Dry Ingredients
In a separate bowl, whisk together the flour, baking powder, and salt. You want them perfectly blended so every cookie bakes up evenly and deliciously, with that signature soft bite.
Step 5: Mix Dough Together
Gradually add the dry mixture to your butter base, mixing just until a soft, slightly sticky dough forms. Don’t overmix! If you want extra fluffy cookies, you can chill the dough for 30 minutes — it helps them hold their cute thumbprint shape.
Step 6: Roll in Cinnamon Sugar
In a small bowl, stir 1/4 cup granulated sugar with the tablespoon of cinnamon. Taking heaping tablespoons of dough, roll them into 1-inch balls, then give each a generous tumble in the cinnamon sugar. This classic coating delivers the snickerdoodle’s signature sparkle and scent!
Step 7: Form the Thumbprints
Arrange the dough balls 2 inches apart on your lined baking sheet. With your thumb (or the back of a teaspoon if you prefer), press a little indentation in the center of each. These will cradle your luscious filling later. Don’t press all the way through — just enough for a cozy nest.
Step 8: Bake
Slide the tray into your preheated oven and bake for 12 to 14 minutes, until the edges are set and just barely golden. The centers will stay soft — perfect for holding a creamy filling!
Step 9: Make the Cream Cheese Filling
While cookies cool, whip together the softened cream cheese, powdered sugar, and 1/2 teaspoon vanilla extract until you have a cloud-like, smooth mixture. This will be the creamy star at the center of every cookie.
Step 10: Fill and Decorate
Once the cookies are completely cool, pipe or spoon a dollop of cream cheese filling into each thumbprint. If you want to take it up a notch, add a tiny drizzle of caramel sauce or a cheerful spoonful of fruit preserves on top. Each cookie bursts with flavor (and a little extra wow factor)!
How to Serve Snickerdoodle Thumbprint Cookies
Garnishes
These cookies are delightful as-is, but a playful garnish can elevate them to bakery-level beauty. Sprinkle with extra cinnamon sugar, add a swirl of caramel, or top with a few sprinkles or a single dried cranberry for a pop of color. Watch them disappear from the plate in record time!
Side Dishes
Pair Snickerdoodle Thumbprint Cookies with steaming mugs of cocoa, spiced chai, or a hot espresso. They’re wonderful as a part of a holiday cookie platter alongside treats like gingerbread or chocolate crinkle cookies, too.
Creative Ways to Present
Arrange these cookies in a vintage cookie tin or on a pretty tiered platter for a festive display. For parties, try individually wrapping them in cellophane bags tied with ribbon—they make irresistible edible gifts! Adding a little note about the “secret” cream cheese center always gets smiles.
Make Ahead and Storage
Storing Leftovers
If you’re lucky enough to have leftovers, store your Snickerdoodle Thumbprint Cookies in an airtight container in the refrigerator, since the cream cheese filling prefers to stay cool and fresh. The cookies will keep beautifully for up to 5 days. Just let them come to room temperature for the best flavor and softness when serving.
Freezing
Want to prep ahead? These cookies freeze like a dream. Place them in a single layer on a baking sheet to freeze, then transfer to a zip-top freezer bag or airtight container. You can also freeze unfilled, baked cookies and add the filling after thawing. They’ll taste bakery-fresh for up to two months!
Reheating
For that just-baked warmth, let frozen cookies thaw in the fridge, then set them on the counter to reach room temperature. If you like, a quick (5-10 second) zap in the microwave softens them gently, but don’t overdo it—the cream cheese filling loves to stay soft, not melted.
FAQs
Can I make the dough ahead of time?
Yes! The dough for Snickerdoodle Thumbprint Cookies can be mixed up to two days in advance. Cover and chill it in the fridge, then scoop and bake straight from the cold—chilled dough helps create perfectly thick cookies every time.
Do I have to use cream cheese filling?
You can absolutely swap in your favorite fillings! Try Nutella, peanut butter, or jam for a fun twist. Or, enjoy them plain for a classic snickerdoodle with a stylish thumbprint.
Why did my cookies spread too much?
If your cookies spread thin, the butter might have been too soft or warm. Chilling the dough before baking helps them keep their cute shape. Using parchment paper (instead of greased pans) also prevents excess spreading.
Can I use whole wheat or gluten-free flour?
You can substitute a 1:1 gluten-free baking flour or use half whole wheat flour for a nuttier flavor. Just keep in mind that texture may be slightly different, but still delicious!
How do I transport Snickerdoodle Thumbprint Cookies for a party?
Let the cookies chill in the fridge to set the filling, then layer them between sheets of parchment in a sturdy container. They travel well and look beautiful on a serving tray at any event!
Final Thoughts
If you’re looking for a playful, crowd-pleasing treat, these Snickerdoodle Thumbprint Cookies deliver nostalgic joy with every bite. With their perfect balance of cinnamon spice, tender crumb, and creamy center, they’re sure to become a beloved part of your cookie rotation. Treat yourself and your loved ones to a batch soon—you’ll be glad you did!
Print
Snickerdoodle Thumbprint Cookies Recipe
- Total Time: 44 minutes
- Yield: 24 cookies 1x
- Diet: Vegetarian
Description
Indulge in these delightful Snickerdoodle Thumbprint Cookies that are a perfect treat for any occasion. These soft, cinnamon-sugar-coated cookies are filled with a creamy center, making them irresistible.
Ingredients
Cookies:
- 1 cup unsalted butter, softened
- 1 cup granulated sugar
- 1 large egg
- 1 teaspoon vanilla extract
- 2 1/2 cups all-purpose flour
- 1/2 teaspoon baking powder
- 1/4 teaspoon salt
- 1/4 cup granulated sugar (for rolling)
- 1 tablespoon ground cinnamon
Cream Cheese Filling:
- 1/2 cup cream cheese, softened
- 1/4 cup powdered sugar
- 1/2 teaspoon vanilla extract
- Optional: caramel sauce or fruit preserves for filling
Instructions
- Preheat the oven: Preheat the oven to 350°F (175°C) and line a baking sheet with parchment paper.
- Prepare the cookie dough: In a large bowl, cream together the butter and 1 cup granulated sugar until light and fluffy. Beat in the egg and vanilla extract. In a separate bowl, whisk together the flour, baking powder, and salt. Gradually add the dry ingredients to the butter mixture to form a dough.
- Coat and shape the cookies: Mix 1/4 cup granulated sugar with cinnamon. Roll the dough into balls, coat each ball in the cinnamon sugar mixture, and place on the baking sheet. Create indentations in each ball.
- Bake: Bake for 12-14 minutes until set.
- Prepare the filling: Beat together the cream cheese, powdered sugar, and vanilla extract until smooth.
- Fill the cookies: Once cooled, fill the indentations with the cream cheese mixture. Optionally, add caramel sauce or fruit preserves on top.
Notes
- Chilling the dough before baking helps the cookies maintain their shape.
- Store cookies with cream cheese filling in the refrigerator in an airtight container.
- Prep Time: 30 minutes
- Cook Time: 14 minutes
- Category: Dessert
- Method: Baking
- Cuisine: American
Nutrition
- Serving Size: 1 cookie
- Calories: 140
- Sugar: 8g
- Sodium: 35mg
- Fat: 7g
- Saturated Fat: 4g
- Unsaturated Fat: 2g
- Trans Fat: 0g
- Carbohydrates: 17g
- Fiber: 0g
- Protein: 1g
- Cholesterol: 25mg