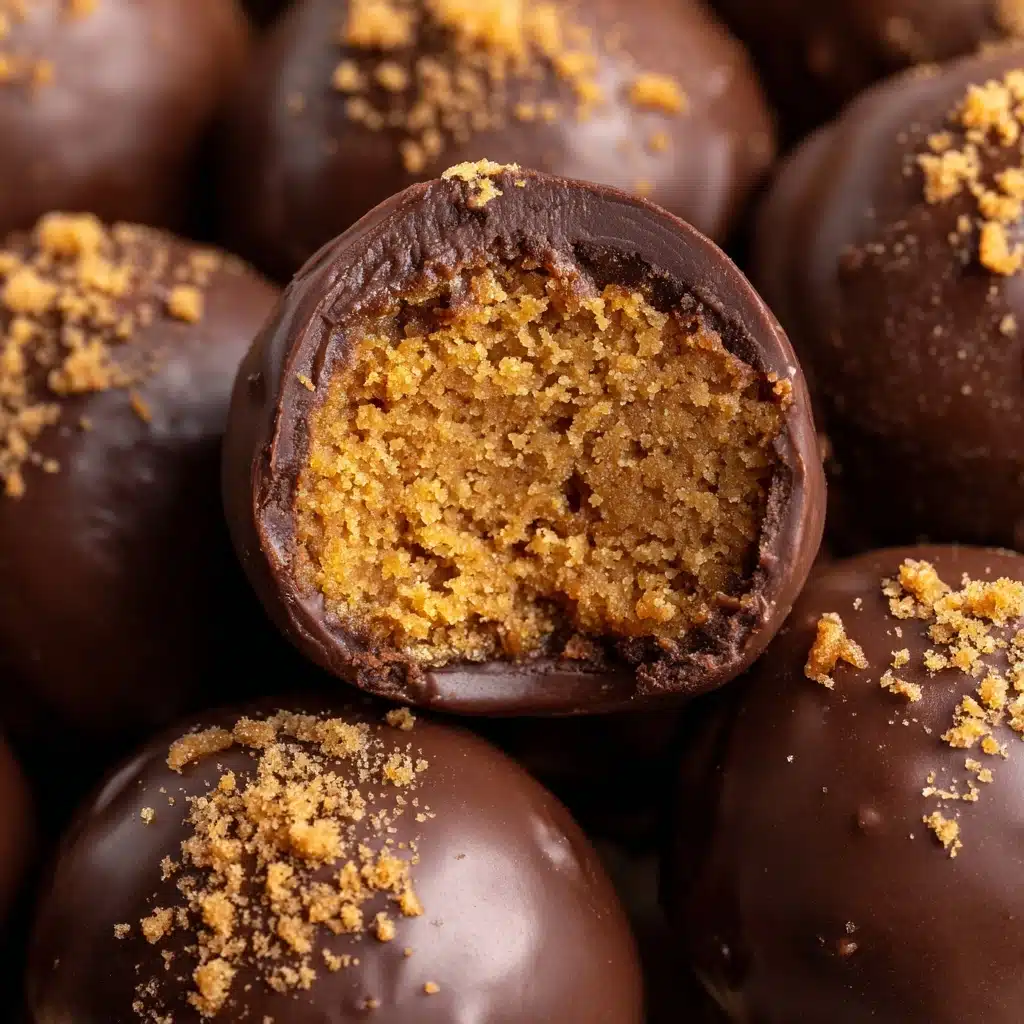
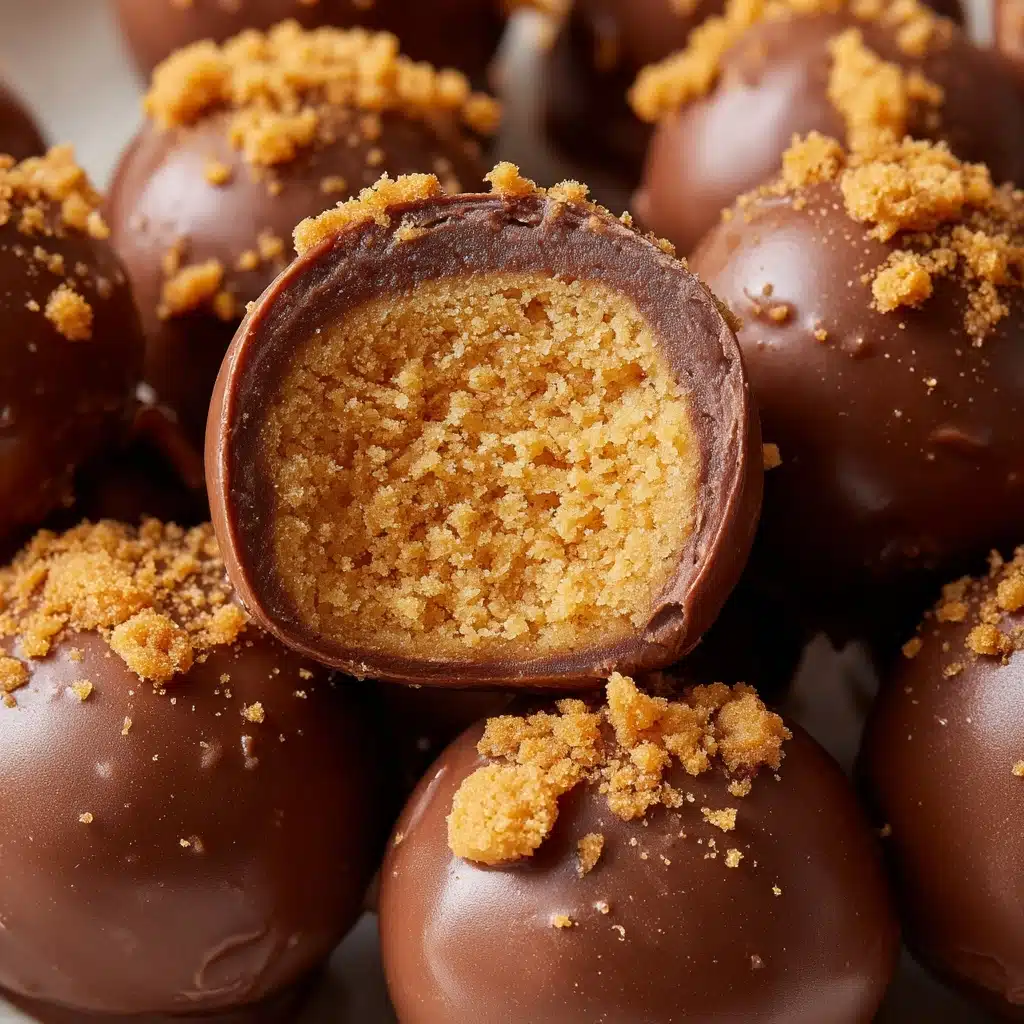
If you’re looking for a show-stopping, crowd-pleasing treat that’s as easy as it is absolutely irresistible, Butterfinger Balls are the answer to your dessert dreams! Creamy peanut butter and crushed Butterfinger bars come together in a rich, melt-in-your-mouth filling, then get wrapped in a silky shell of chocolate for a classic bite-sized indulgence. Whether you’re whipping these up for holiday gifting, birthday parties, or whenever a chocolate craving hits, every little ball is packed with that iconic Butterfinger crunch and salty-sweet flavor. Trust me, once you pop one, you’ll want to keep them all to yourself!
Ingredients You’ll Need
As simple as they are spectacular, the ingredients for Butterfinger Balls are pantry basics with a sweet twist. Each one plays a big role in nailing that melt-in-your-mouth, crunchy-inside, chocolatey-outside perfection.
- Creamy Peanut Butter: Makes the filling rich and smooth, and adds that classic nutty flavor everyone loves.
- Powdered Sugar: Adds sweetness and helps bind the filling without any grittiness.
- Crushed Butterfinger Candy Bars: The star! These bits add the signature crispy crunch and that unmistakable Butterfinger taste.
- Unsalted Butter: Softened butter gives the filling its tender, creamy texture.
- Semi-Sweet Chocolate Chips: Perfectly balances the sweetness with a deep cocoa flavor and creates a snappy chocolate shell.
- Coconut Oil or Shortening (optional): Just a touch helps create a glossy, easily dippable chocolate for the finishing touch.
How to Make Butterfinger Balls
Step 1: Mix the Filling
Start by grabbing a large mixing bowl and stirring together the creamy peanut butter, powdered sugar, crushed Butterfinger candy bars, and softened butter. Mix until everything is thoroughly combined and the mixture is thick (don’t worry if it looks a little crumbly, it will come together when you roll it!). The scent is rich and nutty, and those little Butterfinger pieces make you want to dive right in.
Step 2: Shape Into Balls
Using a tablespoon (or a small cookie scoop), portion out the mixture and roll each one between your palms into a ball. Place each on a parchment-lined baking sheet. If things get sticky, a quick rinse of your hands in cold water helps! You should end up with about 24 perfect little balls.
Step 3: Freeze to Firm
Pop the baking sheet into the freezer for 20 to 30 minutes. This quick chill makes the Butterfinger Balls firm enough to dip, so they hold together and won’t melt or lose shape in the warm chocolate. They’re ready when they’re solid to the touch!
Step 4: Melt the Chocolate
Meanwhile, in a microwave-safe bowl, melt your chocolate chips and coconut oil (if using) in 30-second bursts, stirring every time. Keep a close eye — you want the chocolate smooth and silkily melted, not scorched! The coconut oil makes your chocolate extra glossy and gives a satisfying snap when set.
Step 5: Dip and Chill
Working one at a time, dip each chilled ball into the melted chocolate using a fork or dipping tool, tapping gently to let excess drip off. Place them back on the parchment-lined sheet. For an over-the-top crunch, sprinkle some extra crushed Butterfinger over the top while the chocolate is still wet. Chill in the refrigerator for 15 to 20 minutes, until the chocolate sets beautifully. Your Butterfinger Balls are ready for their closeup!
How to Serve Butterfinger Balls

Garnishes
For extra flair, after dipping in chocolate, sprinkle each Butterfinger Ball with a dusting of crushed Butterfinger, a pinch of flaky sea salt, or a drizzle of melted white chocolate. Not only does this make them even more inviting, but it adds fun texture and a pop of color, too!
Side Dishes
Butterfinger Balls are perfection on their own, but if you want a bigger dessert spread, pair them with fresh fruit like strawberries or sliced apples, or offer them alongside other no-bake treats such as chocolate truffles and fudgy brownies for a decadent sweets platter.
Creative Ways to Present
Showcase your Butterfinger Balls on a pretty tiered stand for holiday gatherings, or box them in mini cupcake liners for edible gifts. For parties, try skewering them on sticks to create Butterfinger “cake pops” or thread them with marshmallows on skewers for a playful dessert kabob!
Make Ahead and Storage
Storing Leftovers
Cover your Butterfinger Balls tightly and keep them in the fridge, where they’ll stay fresh for up to a week. Their texture stays ideal: crisp, creamy, and not too soft. Perfect for snacking or sneaking a sweet bite after dinner!
Freezing
To extend their shelf life, place Butterfinger Balls in a single layer in an airtight container, separating layers with parchment paper. Store in the freezer for up to 2 months. Thaw in the fridge before serving and they’ll taste just as fresh as day one.
Reheating
Butterfinger Balls are at their best chilled, but if you prefer them softer, let them sit at room temperature for 5 to 10 minutes before enjoying. No need to microwave or heat — their chocolate coating will hold up perfectly!
FAQs
Can I use natural peanut butter?
You can, but note that natural peanut butter tends to separate and can make the filling a bit oily or harder to roll. For the smoothest texture and best results, traditional creamy peanut butter (like Jif or Skippy) works best in Butterfinger Balls.
What’s the best way to crush Butterfinger bars?
Unwrap your Butterfinger bars and place them in a zip-top bag, then give them a few firm whacks with a rolling pin or meat mallet. Aim for a mix of fine crumbs and small crunchy bits for the perfect texture inside your Butterfinger Balls.
Can I make these gluten-free?
Yes! Just double-check the label on your Butterfinger bars (most are gluten-free, but ingredients change), and use gluten-free chocolate chips. The rest of the ingredients in Butterfinger Balls are naturally gluten-free, making them a great option for parties with allergies.
Why is my chocolate coating lumpy or streaky?
Chances are your chocolate got overheated or seized. Melt chocolate slowly in 30-second bursts, stirring often. Adding a little coconut oil or shortening can help keep it smooth and shiny for that gorgeous finish on your Butterfinger Balls.
Can I add other mix-ins to the filling?
Absolutely! Chopped roasted peanuts, a handful of mini chocolate chips, or even pretzel bits are great additions to the filling. Stay true to the classic or add your own signature spin — Butterfinger Balls are endlessly customizable!
Final Thoughts
If you’re craving something sweet, easy, and impressively delicious, you have to give Butterfinger Balls a try. Every batch disappears fast, and they’re such a joy to share with friends and family (if you can resist keeping them all for yourself!). Go ahead and treat yourself — you deserve it!
Print
Butterfinger Balls Recipe
- Total Time: 45 minutes
- Yield: 24 balls 1x
- Diet: Vegetarian
Description
These Butterfinger Balls are a delightful no-bake treat that combines creamy peanut butter, crushed Butterfinger candy bars, and a rich chocolate coating. Perfect for satisfying your sweet tooth!
Ingredients
Peanut Butter Mixture:
- 1 (16 oz) jar creamy peanut butter
- 1½ cups powdered sugar
- 1½ cups crushed Butterfinger candy bars (about 8 fun-size bars)
- 2 tablespoons unsalted butter, softened
Chocolate Coating:
- 2 cups semi-sweet chocolate chips
- 1 tablespoon coconut oil or shortening (optional, for smoother chocolate coating)
Instructions
- Mix Peanut Butter Mixture: In a large bowl, combine peanut butter, powdered sugar, crushed Butterfinger, and softened butter until thick.
- Form Balls: Scoop out tablespoon-sized portions, roll into balls, and place on a parchment-lined baking sheet. Freeze for 20–30 minutes until firm.
- Prepare Chocolate Coating: In a microwave-safe bowl, melt chocolate chips with coconut oil in 30-second intervals until smooth.
- Dip and Chill: Dip each chilled ball into the melted chocolate, let excess drip off, and place back on the sheet. Chill in the refrigerator for 15–20 minutes until set.
Notes
- Store Butterfinger Balls in the fridge for up to 1 week or freeze for longer storage.
- For extra crunch, roll the balls in more crushed Butterfinger after dipping in chocolate.
- Prep Time: 25 minutes
- Cook Time: 0 minutes
- Category: Dessert
- Method: No-Bake
- Cuisine: American
Nutrition
- Serving Size: 1 ball
- Calories: 180
- Sugar: 14g
- Sodium: 90mg
- Fat: 11g
- Saturated Fat: 5g
- Unsaturated Fat: 5g
- Trans Fat: 0g
- Carbohydrates: 18g
- Fiber: 1g
- Protein: 3g
- Cholesterol: 5mg