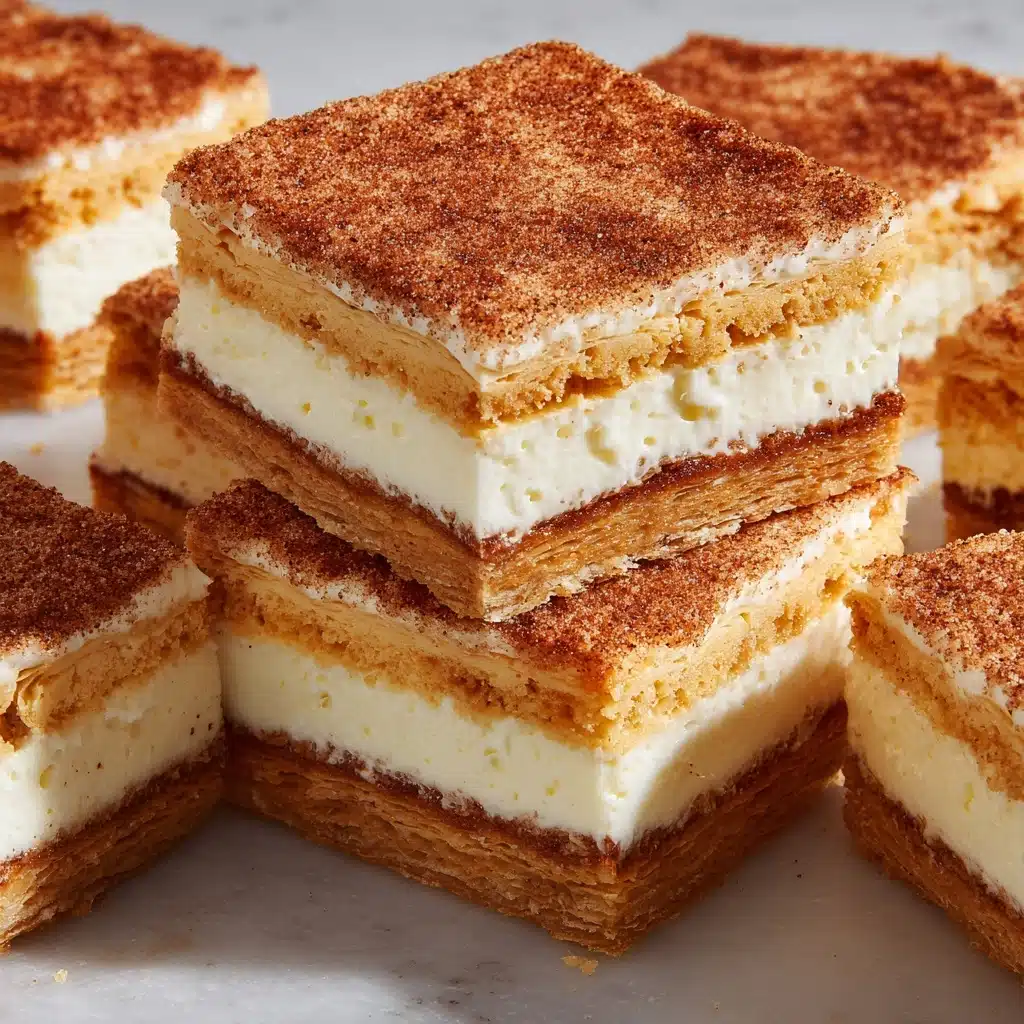
If you’re craving a sweet treat that’s irresistibly creamy, perfectly tender, and stunningly simple, you’re about to fall in love with Cream Cheese Squares. This classic dessert bar blends flaky crescent dough, luscious cream cheese filling, and a cinnamon-sugar topping for a treat that effortlessly wows any crowd. Whether you’re sharing them at a potluck, bringing them to work, or enjoying a quiet moment at home with a cup of coffee, each bite teases you with comfort and pure satisfaction. Trust me, once you try these Cream Cheese Squares, you’ll find every excuse to make them again and again.
Ingredients You’ll Need
With just a handful of ingredients, this recipe proves that dessert magic doesn’t have to be complicated. Each component brings its own flare to the table, creating a rich, crowd-pleasing result every single time.
- Refrigerated crescent roll dough (2 cans, 8 ounces each): This is the secret shortcut to buttery, flaky layers without any fuss. Press and bake for a pastry-like crust!
- Cream cheese (2 packages, 8 ounces each, softened): Provides that signature creamy texture and rich taste, so make sure it’s softened for easy blending.
- Granulated sugar (1 cup plus 1/4 cup for topping): Adds luscious sweetness to both the filling and the irresistible cinnamon-sugar crust.
- Vanilla extract (1 teaspoon): A splash of vanilla rounds out the flavor, enhancing the cheesecake-layer’s depth.
- Unsalted butter (1/4 cup, melted): Brushed over the top, it helps create a golden, melt-in-your-mouth finish.
- Ground cinnamon (1 teaspoon): Mixed with sugar for the ultimate cozy finish on top—think cinnamon roll meets cheesecake!
How to Make Cream Cheese Squares
Step 1: Prepare the Pan and Preheat
Start by preheating your oven to 350°F (175°C). Lightly grease a 9×13-inch baking pan to ensure your Cream Cheese Squares lift out perfectly after baking. There’s nothing more satisfying than a pan full of neat, golden bars waiting for you!
Step 2: Create the Bottom Layer
Open your first can of crescent roll dough and gently unroll it. Press it evenly into the bottom of your prepared pan, making sure to seal all the seams. This creates the buttery, flaky base that balances the rich filling. No need to be a perfectionist here—once it bakes up, it gets delightfully crisp and golden!
Step 3: Mix the Creamy Filling
In a medium bowl, beat together the softened cream cheese, 1 cup granulated sugar, and vanilla extract until the mixture is wonderfully smooth and creamy. A hand mixer works best for this step, but a sturdy whisk and some elbow grease will also do the trick in a pinch.
Step 4: Layer the Cream Cheese Mixture
Spread the cream cheese filling evenly over your crescent dough base. Take your time here—the smoother your layer, the more evenly each Cream Cheese Square will taste!
Step 5: Add the Top Crescent Layer
Unroll the second can of crescent roll dough and carefully drape it over the cream cheese mixture. Press the seams to seal. Don’t worry if it looks a little rustic; the top will be covered with a cinnamon-sugar crown soon enough.
Step 6: Butter and Sprinkle
Brush the melted butter evenly over the top layer of dough. In a small bowl, combine the remaining 1/4 cup granulated sugar with the cinnamon. Sprinkle this sweet-spiced mix evenly across the buttered dough for the best finish imaginable—it bakes into a golden, sparkling crust that’s simply irresistible.
Step 7: Bake to Perfection
Bake for 25–30 minutes, until the top is golden brown and puffed slightly. Your kitchen will smell incredible! Once baked, allow the pan to cool completely before popping it in the fridge for at least 1 hour. This step is key for neat slices and that velvety texture classic Cream Cheese Squares are known for.
How to Serve Cream Cheese Squares

Garnishes
While Cream Cheese Squares are heavenly on their own, a little extra flare never hurts. Try a light drizzle of honey, a handful of chopped toasted pecans or walnuts, or even a dusting of powdered sugar right before serving for a finishing touch that feels truly special.
Side Dishes
Balance out the richness by pairing your squares with something fresh and bright. Fresh berries or a tangy fruit salad cut through the creaminess beautifully. For a cozier dessert spread, serve them alongside a mug of robust coffee or spiced chai latte.
Creative Ways to Present
For parties or showers, cut the squares into bite-sized pieces and arrange them on a tiered platter. Or, tuck individual Cream Cheese Squares into parchment wrappers for a portable treat at bake sales or picnics. Want to impress? Stack and tie them with kitchen twine for an adorable edible gift.
Make Ahead and Storage
Storing Leftovers
These bars stay dreamy in the fridge for up to five days! Just cover the pan tightly with plastic wrap or store squares in an airtight container. They taste even better chilled as the flavors meld together and the filling sets up perfectly.
Freezing
If you want to keep these for longer, Cream Cheese Squares freeze beautifully. Slice them first, then layer between sheets of parchment or wax paper in a freezer-safe container. They’ll keep for up to three months—just thaw overnight in the fridge for a sweet treat whenever cravings strike!
Reheating
While these squares are typically enjoyed cold, you can gently warm them in the microwave for a few seconds if you prefer a softer texture. Just be careful not to overheat, as the cream cheese filling can become runny.
FAQs
Can I use low-fat cream cheese in Cream Cheese Squares?
Yes, you can substitute low-fat cream cheese, but the texture may be slightly less rich and creamy. Full-fat cream cheese delivers the classic flavor and luxurious mouthfeel everyone loves.
Can I make Cream Cheese Squares ahead of time?
Absolutely! These squares are ideal for making a day in advance—the chill time actually improves their flavor and texture. Hold off on any garnishes until just before serving for the freshest look.
Can I add fruit or other mix-ins?
Definitely! Swirl in a few spoonfuls of your favorite jam (like raspberry or strawberry) between the layers, or sprinkle some mini chocolate chips into the cream cheese mixture for a fun twist.
Do I need to seal the seams in the crescent dough?
Yes, pressing the seams together in both the bottom and top layers helps create that unified crust. It ensures every Cream Cheese Square holds together without leaking filling during baking.
Can I double the recipe for a party?
You sure can! Simply use a larger pan or two 9×13-inch pans. Watch the baking time—depending on your oven, you might need a little extra time to get everything golden and set.
Final Thoughts
There’s a reason Cream Cheese Squares have fans wherever they go—their simple ingredients, luscious flavors, and nostalgic comfort just hit all the right notes. Mix up a batch soon, and don’t be surprised when they become your most-requested dessert for every celebration and Sunday afternoon alike. You’ll be proud to share—and savor—every single square!
Print
Cream Cheese Squares Recipe
- Total Time: 45 minutes
- Yield: 12 squares 1x
- Diet: Vegetarian
Description
Indulge in the creamy goodness of these easy-to-make Cream Cheese Squares. A delectable dessert that combines flaky crescent roll dough with a rich cream cheese filling, topped with a sweet cinnamon sugar glaze.
Ingredients
Crescent Roll Dough:
- 2 cans (8 ounces each) refrigerated crescent roll dough
Cream Cheese Filling:
- 2 packages (8 ounces each) cream cheese, softened
- 1 cup granulated sugar
- 1 teaspoon vanilla extract
Top Layer and Topping:
- 1/4 cup unsalted butter, melted
- 1/4 cup granulated sugar (for topping)
- 1 teaspoon ground cinnamon
Instructions
- Preheat and Prepare: Preheat the oven to 350°F (175°C) and lightly grease a 9×13-inch baking pan.
- Layer Dough: Unroll one can of crescent roll dough and press it into the bottom of the prepared pan, sealing the seams.
- Prepare Filling: Beat softened cream cheese with granulated sugar and vanilla extract until smooth. Spread over the dough.
- Add Top Layer: Unroll the second can of dough on top, pressing to seal. Brush with melted butter.
- Add Topping: Mix granulated sugar and cinnamon, then sprinkle over the buttered top.
- Bake: Bake for 25-30 minutes until golden and puffed.
- Cool and Serve: Cool in the pan, then refrigerate before cutting into squares.
Notes
- For variation, try drizzling honey or adding chopped nuts on top.
- Store bars in the refrigerator for up to 5 days.
- Prep Time: 15 minutes
- Cook Time: 30 minutes
- Category: Dessert
- Method: Baking
- Cuisine: American
Nutrition
- Serving Size: 1 square
- Calories: 320
- Sugar: 20g
- Sodium: 280mg
- Fat: 20g
- Saturated Fat: 12g
- Unsaturated Fat: 7g
- Trans Fat: 0g
- Carbohydrates: 30g
- Fiber: 0g
- Protein: 4g
- Cholesterol: 50mg