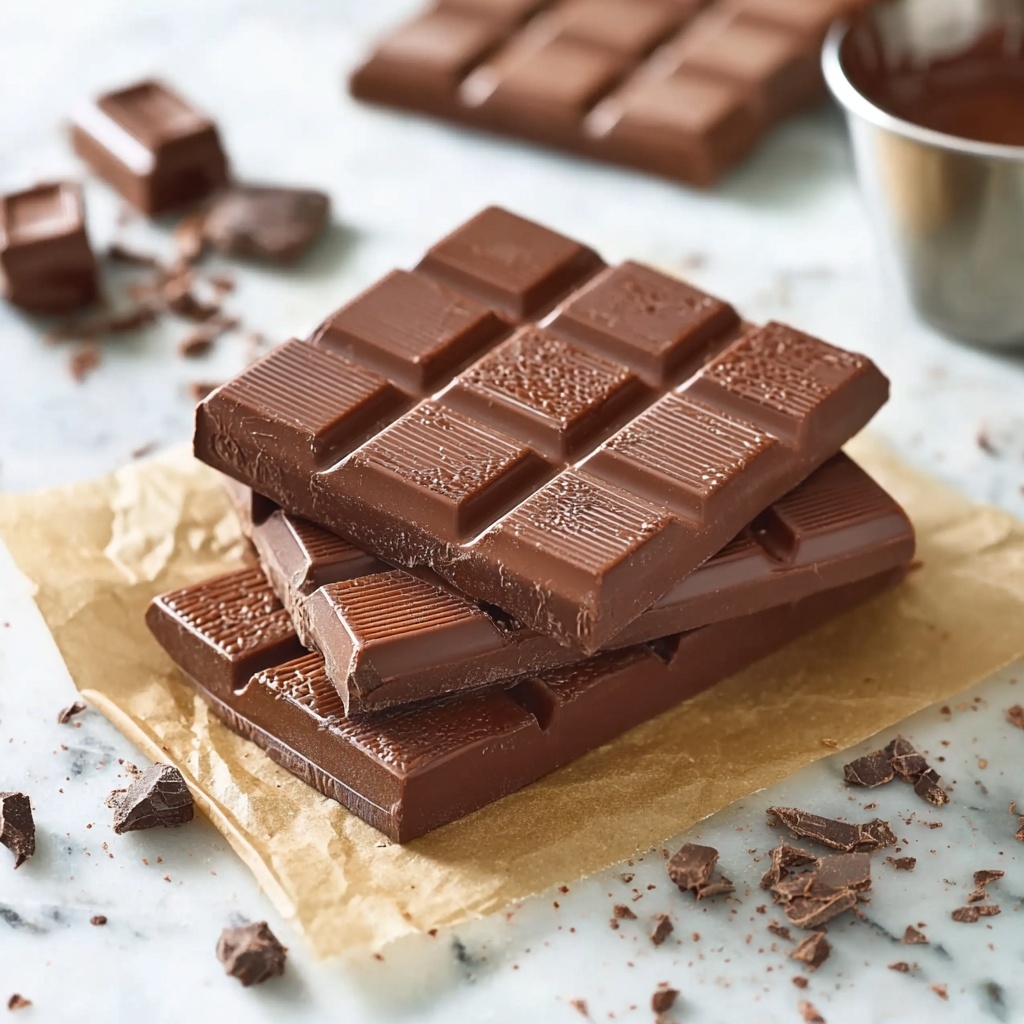
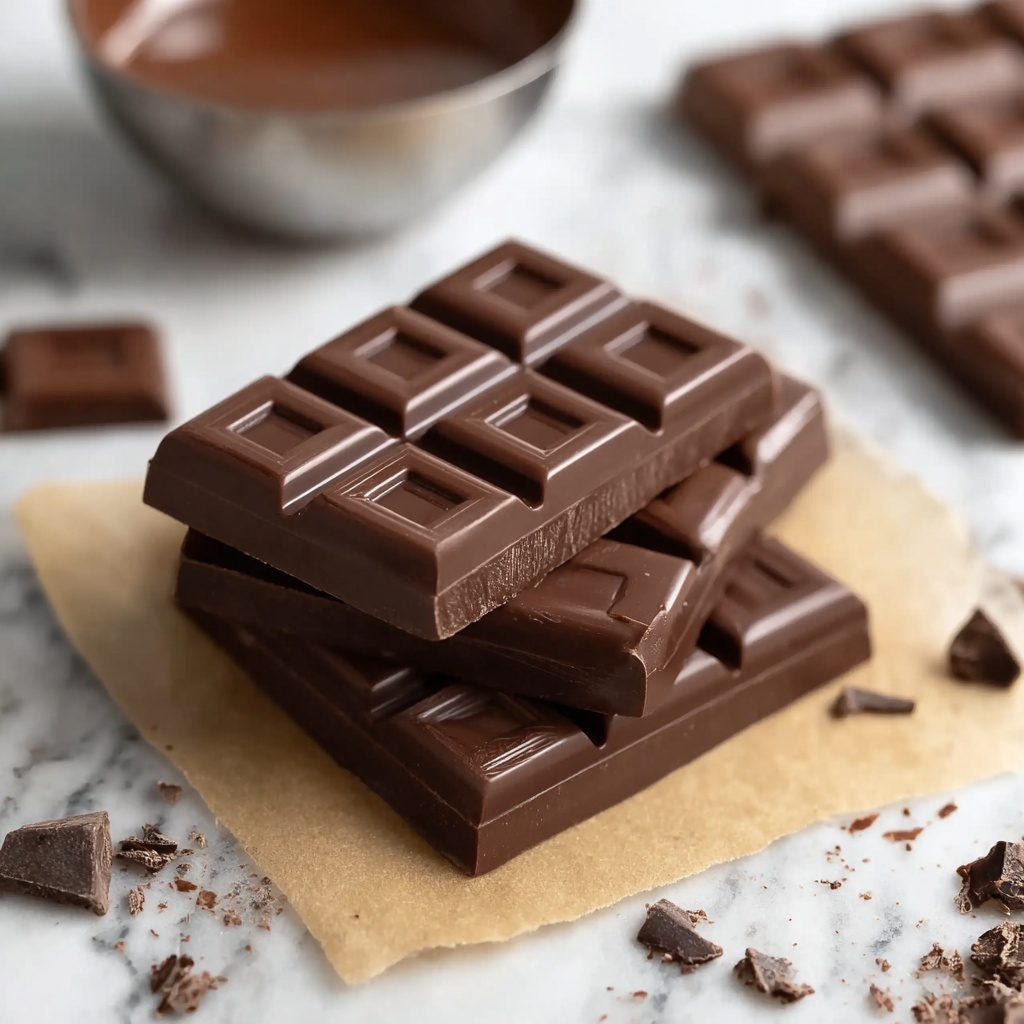
If you have a soft spot for rich, smooth chocolate but want to skip the dairy, you’re going to absolutely adore this Deliciously Creamy Dairy-Free Chocolate Recipe. It’s a luscious blend of pure cacao and creamy coconut milk powder that melts on your tongue, offering all the indulgence of traditional chocolate without any dairy. Whether you’re dairy-free by choice or necessity, this recipe brings together simple, natural ingredients to create a treat that’s satisfyingly sweet, perfectly textured, and bursting with that deep, chocolatey flavor you crave.
Ingredients You’ll Need
Get ready to gather just a handful of essential ingredients that each play a vital role in crafting this dreamy chocolate. From the rich cacao butter bringing a silky smoothness to the coconut milk powder adding creamy body, every component has a purpose in delivering the perfect balance of taste and texture.
- Cacao liquor (6.3 oz): This provides the intense chocolate flavor, and using cacao nibs instead adds a delightful bit of crunch.
- Cacao butter (8 oz): Adds luscious creaminess and helps the chocolate set with a glossy finish.
- Dairy-free coconut milk powder (1 cup): The secret to that rich, creamy texture without any dairy.
- Powdered sugar (1 cup): Sweetens the chocolate smoothly, but coconut sugar works just as well for a subtle caramel note.
- Vanilla pod (1, halved and scraped): Infuses the chocolate with warm, fragrant flavor nuances.
- Himalayan pink salt (0.5 teaspoon): A tiny pinch to expertly balance and enhance the sweetness and deepen flavor complexity.
How to Make Deliciously Creamy Dairy-Free Chocolate Recipe
Step 1: Preparing Your Workspace and Ingredients
Start by setting out your silicone molds on a sturdy tray; this makes transferring your chocolate to the fridge hassle-free. Carefully cut your vanilla pod in half lengthwise and scrape out the precious seeds—these will elevate your chocolate’s aroma and flavor tremendously.
Step 2: Melting the Chocolate Base
Place the cacao liquor and cacao butter into a heat-resistant bowl and set it over a saucepan with gently simmering water. Stir slowly and patiently until both have melted into a velvety liquid. This delicate melting process is key to preserving the quality and glossiness of your chocolate.
Step 3: Combining the Ingredients for Creaminess and Sweetness
Remove the bowl from the heat and whisk in the powdered sugar until smooth and shiny. Follow this by adding the coconut milk powder, salt, and vanilla seeds. Keep whisking until every ingredient melds into a silky chocolate mixture that feels rich yet light to the touch.
Step 4: Heating and Straining the Mixture
Place the bowl back over the warm water bath and gently heat the mixture to about 50°C. This temperature is just right to encourage a smooth texture. Then, carefully remove the bowl from the heat and strain the chocolate through a fine sieve into a clean bowl to catch any lumps or vanilla pod remnants.
Step 5: Cooling and Tempering for Perfect Texture
Set the bowl over a chilled ice water bath and stir continuously until the chocolate cools down to 28°C. This step is crucial—it helps your chocolate set with that perfect snap and sheen. Give it a final warm-up back over the water bath to 30°C before molding.
Step 6: Pouring into Molds and Setting
Pour the beautifully tempered chocolate into your silicone molds. Pop them into the fridge for at least 20 minutes and let the magic happen. Once fully set, gently remove the chocolate bars and wrap them in baking paper to keep them fresh and easy to share.
How to Serve Deliciously Creamy Dairy-Free Chocolate Recipe

Garnishes
Boost your chocolate’s visual and flavor appeal with simple garnishes like a sprinkle of crushed toasted nuts, flaky sea salt, or edible flower petals. These little touches elevate each bite and make your chocolate bars feel delightfully gourmet.
Side Dishes
Pair your dairy-free chocolate with fresh berries or sliced tropical fruits like mango and pineapple to complement its intense cocoa flavor with bright, juicy freshness. A cup of herbal tea or almond milk latte also makes a lovely companion for a cozy chocolate moment.
Creative Ways to Present
Turn your chocolate into an unforgettable gift by wrapping the bars in colorful parchment with a tied ribbon. You can also break chunks into a bowl for a casual chocolate fondue or chop pieces to sprinkle over dairy-free ice cream or smoothie bowls for a satisfying crunch.
Make Ahead and Storage
Storing Leftovers
Keep any leftover dairy-free chocolate bars wrapped tightly in baking paper or foil within an airtight container. Store them in a cool, dark place, ideally below 70°F, to maintain their texture and flavor for up to two weeks.
Freezing
If you want to enjoy your Deliciously Creamy Dairy-Free Chocolate Recipe for longer, freezing is a great option. Wrap each bar individually and place them in an airtight freezer bag. Frozen bars can last for up to three months without losing their rich flavor.
Reheating
When you want to indulge in your frozen chocolate, simply let the bars thaw at room temperature for about 10-15 minutes. Avoid microwaving as it may affect the smooth texture; patience preserves the chocolate’s glorious creaminess.
FAQs
Can I use different sweeteners in this recipe?
Absolutely! While powdered sugar creates a smooth texture, you can substitute coconut sugar or maple sugar for a more caramel-like depth. Just ensure it’s finely ground to incorporate well.
Is this chocolate suitable for vegans?
Yes, this recipe is completely vegan as it contains no animal products. Using coconut milk powder instead of dairy keeps it rich while being plant-based.
What if I don’t have a silicone mold?
You can substitute silicone molds with a small lined baking tray or ice cube trays. Just be sure to use parchment or baking paper to make removal easier once set.
Can I add nuts or dried fruits to this chocolate?
Definitely! Adding chopped nuts, dried berries, or even a sprinkle of shredded coconut before chilling adds texture and flavor variations that are delightful.
How long does it take for the chocolate to set?
Typically, it takes about 20 minutes in the fridge for the chocolate bars to fully set and firm up. For best results, avoid disturbing the molds during this time.
Final Thoughts
This Deliciously Creamy Dairy-Free Chocolate Recipe has become one of my absolute favorites to share with friends and family, especially anyone seeking a luscious dairy-free treat that truly satisfies. It’s simple, indulgent, and full of love in every bite. Trust me, once you try it, you’ll want to keep this recipe close for all your chocolate cravings!
Print
Deliciously Creamy Dairy-Free Chocolate Recipe
- Prep Time: 25 minutes
- Cook Time: 45 minutes
- Total Time: 1 hour 10 minutes
- Yield: 8 servings
- Category: Dessert
- Method: Stovetop
- Cuisine: Vegan
- Diet: Vegan
Description
Enjoy a rich and creamy dairy-free chocolate bar made with cacao liquor, cacao butter, and coconut milk powder. This decadent treat combines smooth textures with natural sweetness and a hint of vanilla, crafted without any dairy for a creamy vegan chocolate experience you won’t resist.
Ingredients
Chocolate Base
- 6.3 oz Cacao liquor (or cacao nibs for a crunch)
- 8 oz Cacao butter
Dry Ingredients
- 1 cup Dairy-free coconut milk powder
- 1 cup Powdered sugar (or coconut sugar)
- 0.5 teaspoon Himalayan pink salt
Flavoring
- 1 pod Vanilla (cut in half and seeds scraped)
Instructions
- Preparation: Gather all ingredients and prepare your workspace. Have silicone molds and trays ready for setting the chocolate in later steps.
- Prepare the Molds: Arrange your silicone molds on trays for easy transfer to the fridge. Cut the vanilla pod in half and carefully scrape out the seeds, setting them aside and discarding the empty pod.
- Melt the Base: Place the cacao liquor and cacao butter in a large heat-resistant bowl. Set the bowl over a saucepan with simmering water to create a double boiler. Stir gently until both have fully melted and blended into a smooth liquid.
- Whisk the Ingredients: Remove the bowl from the heat. Add the powdered sugar and whisk thoroughly until fully incorporated. Then add dairy-free coconut milk powder, Himalayan pink salt, and vanilla seeds. Mix well until the mixture is smooth and uniform.
- Heat the Chocolate: Return the bowl over the simmering water bath, gently heating the mixture to 50°C (122°F). Once reached, carefully remove the bowl and pass the chocolate through a fine sieve into a clean bowl to remove any lumps or impurities.
- Cool the Chocolate: Place the bowl over an ice water bath. Stir continuously until the chocolate cools down to 28°C (82°F). Afterward, briefly reheat it in the water bath until it reaches 30°C (86°F) to achieve the perfect tempering temperature for smooth texture and shine.
- Mold the Bars: Pour the tempered chocolate mixture into your silicone molds. Chill in the refrigerator for at least 20 minutes, or until fully set. Once hardened, carefully remove the chocolate bars from the molds and wrap them in baking paper to preserve freshness.
Notes
- Use a candy or kitchen thermometer to accurately monitor chocolate temperatures during tempering.
- Cacao nibs can be used instead of cacao liquor to add a crunchy texture to the final chocolate bars.
- Ensure no water comes into contact with the chocolate while melting to prevent seizing.
- Store finished chocolate bars in a cool, dry place or refrigerated depending on your climate to maintain texture and flavor.
- For a sweetener alternative, coconut sugar can replace powdered sugar for a more natural sweetness.

