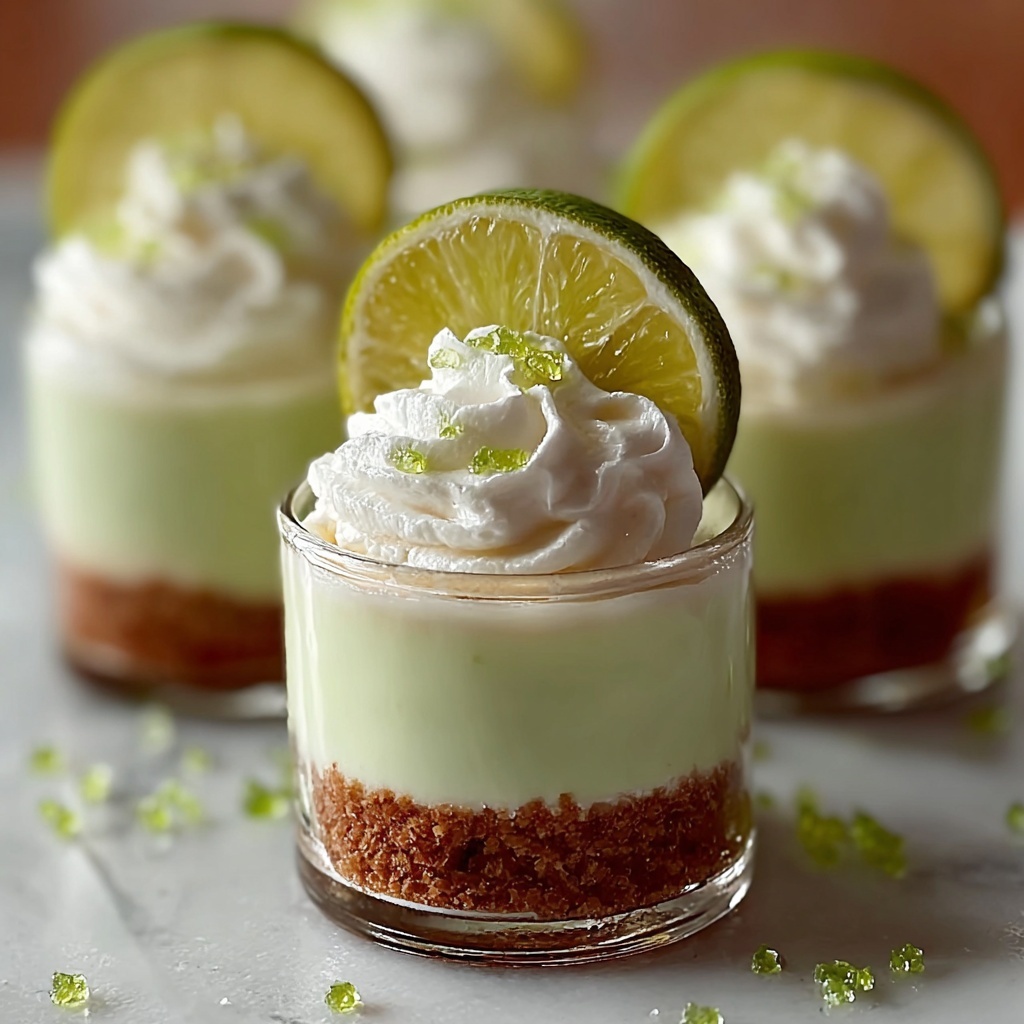
If you’ve been searching for a treat that perfectly balances tart and sweet while impressing friends and family every single time, then you have to try this Dreamy Key Lime Pie Mini Desserts That Wow Every Time Recipe. These little delights pack all the classic charm of key lime pie into bite-sized wonders with a graham cracker crust that crunches right under a velvety, tangy lime filling. Each spoonful is a refreshing escape to tropical sunshine, making them the ultimate showstopper for any occasion. Trust me, once you make these, they’ll become your go-to dessert for celebrations or whenever you need a pick-me-up.
Ingredients You’ll Need
All you need are a few simple, wholesome ingredients that come together beautifully to create layers of texture, taste, and color. Each ingredient plays a special role, whether it’s the buttery crust, the creamy filling, or that bright pop of key lime.
- Graham Cracker Crumbs (1 1/2 cups): This creates the crunchy, sweet base that holds the dessert together perfectly—feel free to swap with ginger snaps or gluten-free cookies for variety.
- Melted Butter (1/3 cup): Unsalted butter works best for richness and to bind the crust, but coconut oil is a great alternative that adds a subtle tropical touch.
- White Sugar (1/4 cup): Adds sweetness to the crust; brown sugar is a nice option if you want a hint of caramel flavor.
- Reduced-Fat Cream Cheese (8 oz): Provides the creamy, tangy body of the filling—full-fat will give a richer, more indulgent texture.
- Low-Fat Vanilla Greek Yogurt (1 cup): Brings a light, smooth tang that blends beautifully with the lime juice; flavored yogurts can add a subtle twist.
- Fat-Free Sweetened Condensed Milk (1/2 cup): Sweetens and thickens the filling; opt for dairy-free if you want to keep it vegan-friendly.
- Key Lime Juice (1/4 cup): The star of the show—fresh key limes give that authentic zesty punch that keeps the pie mini desserts bright and refreshing.
- Green Food Coloring (a few drops, optional): Adds a fun visual pop, making the dessert even more eye-catching.
How to Make Dreamy Key Lime Pie Mini Desserts That Wow Every Time Recipe
Step 1: Prepare the Crust
Start by mixing the graham cracker crumbs, melted butter, and sugar in a bowl until the mixture is well combined and holds together when pressed. Then, firmly press this mixture into the bottoms of your mini dessert glasses. This crust forms a crunchy base that provides a wonderful texture contrast to the creamy filling and keeps everything beautifully structured.
Step 2: Make the Filling
In a medium bowl, beat the reduced-fat cream cheese and vanilla Greek yogurt together until silky and smooth. Meanwhile, whisk the sweetened condensed milk with the fresh key lime juice in a separate bowl. Next, gently fold the lime mixture into the cream cheese blend to create a luscious, tangy filling that’s bursting with flavor.
Step 3: Divide and Color
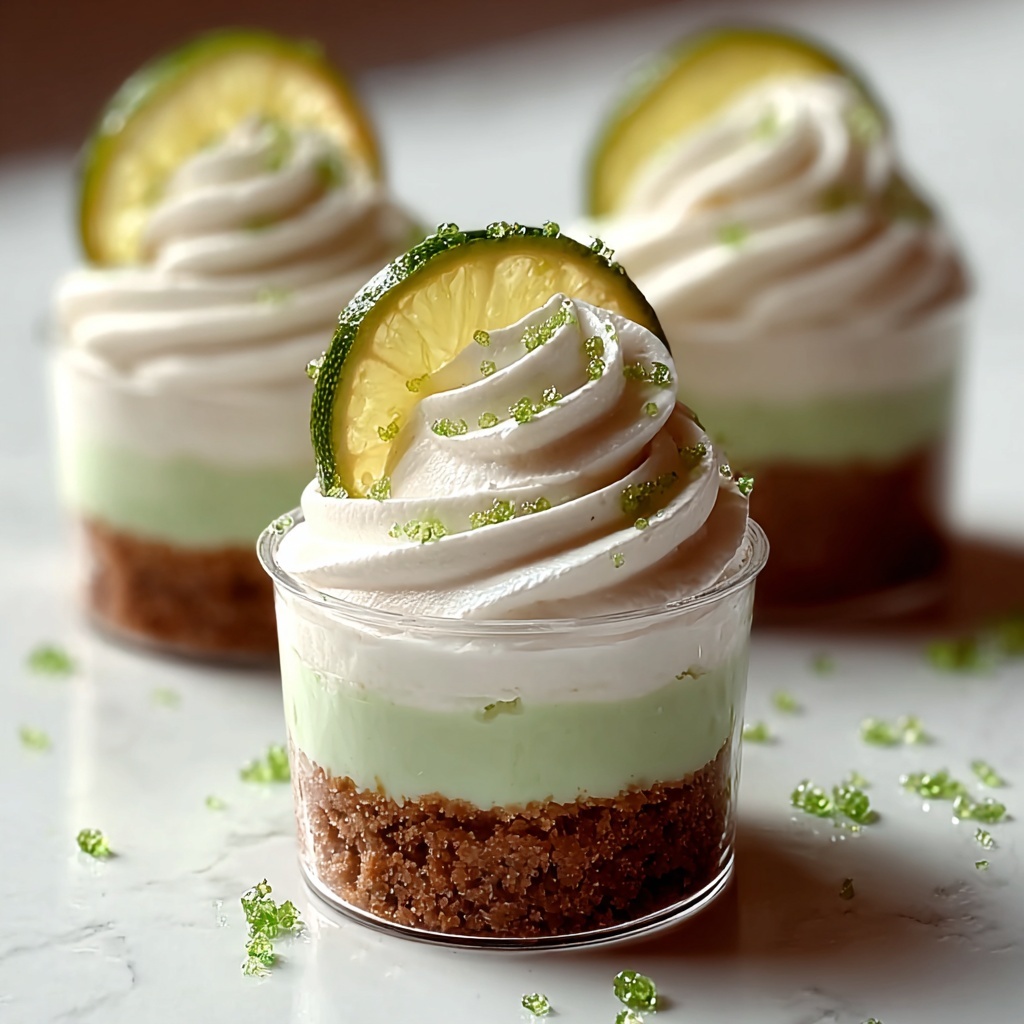
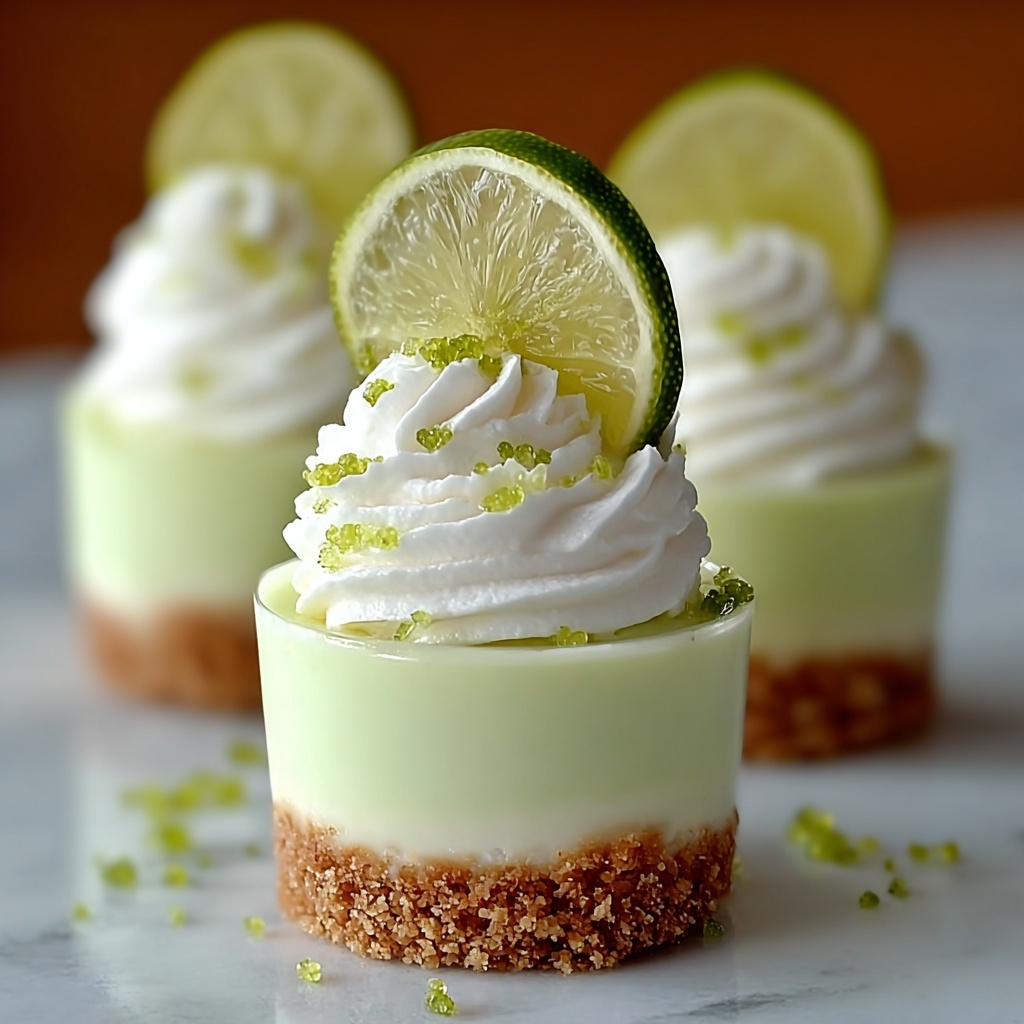
For that extra wow factor, split the creamy filling into two equal portions. If you want to add a playful pop of color, mix a few drops of green food coloring into one portion until you get a vibrant lime hue. This step is optional but highly recommended for stunning, layered mini desserts.
Step 4: Assemble the Mini Desserts
Using piping bags or spoons, alternate layering the plain and green-colored fillings into the dessert glasses. After each layer, gently tap the glasses on your countertop to even out the filling and create distinct, elegant layers. This technique results in a beautiful two-tone effect that will have everyone asking how you did it.
Step 5: Chill to Set
Cover your assembled mini desserts tightly with plastic wrap and refrigerate for at least 2 hours. This chilling time lets the flavors meld, the filling to set with the perfect dreamy creaminess, and the crust to remain crisp. Patience here really leads to perfection.
Step 6: Garnish Before Serving
Right before serving, add a personal touch by topping each dessert with a fluffy dollop of whipped cream, a sprinkle of fresh lime zest, or some crushed graham crackers for an extra crunch. These little details elevate the presentation and add delightful texture variations.
How to Serve Dreamy Key Lime Pie Mini Desserts That Wow Every Time Recipe
Garnishes
Adding garnishes like whipped cream, lime zest, or even tiny mint leaves not only decorates your mini desserts but also enhances the flavor profile, offering a refreshing balance between sweet, creamy, and citrusy. The lime zest especially brightens the overall experience with little bursts of aroma.
Side Dishes
These mini pies pair wonderfully with light sides such as fresh berries, tropical fruit salads, or a small scoop of coconut sorbet. These complementary accompaniments keep the dessert experience light and breezy without overpowering the key lime’s unique zing.
Creative Ways to Present
Serve these Dreamy Key Lime Pie Mini Desserts That Wow Every Time Recipe in clear glasses to showcase the layered filling’s beautiful colors. You could also try mini mason jars or colorful ramekins for a fun, casual vibe. Adding decorative mini spoons or placing them on a rustic wooden tray with fresh leaves or flowers really turns them into dessert art.
Make Ahead and Storage
Storing Leftovers
Store any leftover mini desserts covered tightly with plastic wrap or in an airtight container in the refrigerator. They’ll keep delicious and fresh for up to 3 days, making them a perfect option to prepare ahead for parties or gatherings.
Freezing
If you want to make these desserts well in advance, you can freeze them. Place them uncovered in the freezer until firm, then wrap or cover tightly. When stored properly, they freeze well for up to 1 month. Thaw overnight in the fridge before serving for the best texture.
Reheating
These little key lime pies are best served chilled, so reheating is not recommended. If they’ve been frozen, just thaw them in the refrigerator and serve cold to enjoy their full creamy and tangy charm.
FAQs
Can I use regular lime juice instead of Key Lime Juice?
You certainly can, though key lime juice offers a unique tartness and aroma that’s signature to this recipe. If you use regular lime, you’ll still get a great dessert, just slightly different in flavor.
Is there a dairy-free version of this recipe?
Absolutely! Substitute the cream cheese with a plant-based cream cheese, use coconut or almond yogurt for the Greek yogurt, and look for a dairy-free condensed milk alternative. The flavors will still be bright and delicious.
How long do the mini desserts need to chill?
At minimum, 2 hours in the refrigerator is needed for setting, but chilling longer (up to overnight) actually intensifies the flavors and texture. The wait is definitely worth it!
Can I make these without food coloring?
Of course! The food coloring is just an optional fun touch to create visual layers. The dessert tastes amazing even without it, so feel free to skip it if you prefer a more natural look.
What’s the best way to serve these at a party?
Serve them chilled in mini glasses or jars with little spoons. Garnish just before guests arrive for freshness, and consider setting them on a decorative tray with some fresh lime slices or mint leaves for a festive touch.
Final Thoughts
Whether you’re a key lime pie devotee or just in the mood for a sweet, tangy dessert that’s easy to whip up and impossible not to love, the Dreamy Key Lime Pie Mini Desserts That Wow Every Time Recipe is your new best friend. These mini pies combine refreshingly vibrant flavors with creamy textures wrapped in a crunchy crust that always delivers exactly what you want in a dessert. Go ahead—make these for your next gathering or simply to brighten a day at home. I promise, once these little beauties hit your taste buds, they’ll have a permanent spot in your recipe collection.
Print
Dreamy Key Lime Pie Mini Desserts That Wow Every Time Recipe
- Prep Time: 20 minutes
- Cook Time: 0 minutes
- Total Time: 2 hours 20 minutes
- Yield: 12 servings
- Category: Dessert
- Method: No-Cook
- Cuisine: American
- Diet: Low Fat
Description
These Dreamy Key Lime Pie Mini Desserts are a delightful no-bake treat that combines a crunchy graham cracker crust with a creamy, tangy key lime filling. Perfectly portioned in individual glasses, they feature a beautiful two-tone effect and set in the refrigerator for a refreshing and light dessert that impresses every time.
Ingredients
Crust
- 1 1/2 cups Graham Cracker Crumbs (can substitute with ginger snaps or gluten-free cookies)
- 1/3 cup Melted Butter (unsalted butter or coconut oil works well)
- 1/4 cup White Sugar (brown sugar can be used for a caramel flavor)
Filling
- 8 oz Reduced-Fat Cream Cheese (or full-fat for a richer taste)
- 1 cup Low-Fat Vanilla Greek Yogurt (can substitute with flavored yogurt)
- 1/2 cup Fat-Free Sweetened Condensed Milk (dairy-free alternatives available)
- 1/4 cup Key Lime Juice (fresh key limes recommended)
- a few drops Green Food Coloring (optional for visual appeal)
Garnish (Optional)
- Whipped Cream
- Lime Zest
- Crushed Graham Crackers
Instructions
- Prepare the Crust: In a bowl, combine the graham cracker crumbs, melted butter, and white sugar. Mix until well incorporated. Press this mixture firmly into the bottom of mini dessert glasses to create a crunchy and cohesive base.
- Make the Filling: In a medium bowl, beat the reduced-fat cream cheese and vanilla Greek yogurt together until smooth and creamy. In a separate bowl, whisk together the fat-free sweetened condensed milk and fresh key lime juice. Gently fold this liquid mixture into the cream cheese and yogurt blend until fully combined.
- Divide and Color: Split the creamy filling into two equal portions. If desired, add a few drops of green food coloring to one portion and gently mix until the color is evenly distributed, creating a bright green hue for a fun visual effect.
- Assemble the Layers: Using piping bags or spoons, alternate layering the plain and colored fillings into the prepared dessert glasses. Tap the glasses gently on the counter to level the filling and achieve a beautiful two-tone appearance.
- Chill: Cover the assembled mini desserts with plastic wrap and refrigerate them for at least 2 hours. This chilling time allows the filling to set and become delightfully creamy and firm.
- Garnish and Serve: Just before serving, add a dollop of whipped cream on top of each dessert. Sprinkle with lime zest or crushed graham crackers for added flavor, texture, and an elegant finishing touch.
Notes
- You can substitute graham cracker crumbs with ginger snaps or gluten-free cookies to accommodate dietary preferences.
- Use full-fat cream cheese for a richer taste if desired.
- Flavored Greek yogurt can be used as a substitute for vanilla yogurt for added flavor variations.
- Green food coloring is optional and primarily for visual appeal; omit if preferred.
- Dairy-free sweetened condensed milk substitutions can be used to make the recipe dairy-free.
- Chilling time is crucial for the filling to set properly; do not skip.


