Description
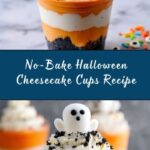
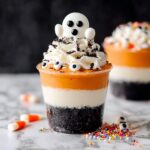
These No-Bake Halloween Cheesecake Cups are a festive and creamy dessert perfect for the spooky season. Featuring a buttery graham cracker crust and creamy, colorful cheesecake layers tinted with orange and black food coloring, they are both visually striking and delicious. With no baking required, they come together quickly and make for an easy-to-serve treat for parties or family gatherings.
Ingredients
Scale
Crust
- 1 1/2 cups graham cracker crumbs
- 1/4 cup unsalted butter, melted
Cheesecake Filling
- 16 ounces cream cheese, softened
- 1/2 cup granulated sugar
- 1 teaspoon vanilla extract
- 1 cup heavy whipping cream
- 1/4 cup powdered sugar
- 1/2 teaspoon orange food coloring
- 1/2 teaspoon black food coloring
Decoration
- Halloween-themed sprinkles or candy for decoration
Instructions
- Prepare the Crust: In a medium bowl, combine the graham cracker crumbs with the melted butter until the mixture is evenly moistened. Press about 2 tablespoons of this mixture firmly into the bottom of each serving cup or small jar to create a solid crust base.
- Mix the Cream Cheese Base: In a large mixing bowl, beat the softened cream cheese, granulated sugar, and vanilla extract together until the mixture is smooth and creamy with no lumps.
- Whip the Cream: In a separate bowl, whip the heavy cream with the powdered sugar using a hand beater or stand mixer until stiff peaks form, meaning the cream holds its shape firmly when the beaters are lifted.
- Combine Mixtures: Gently fold the whipped cream into the cream cheese mixture. Use a spatula to fold carefully so the mixture stays light and airy, stirring just until completely combined.
- Divide and Tint: Split the cheesecake mixture evenly into two bowls. Add orange food coloring to one bowl and black food coloring to the other, stirring each until the colors are uniform.
- Assemble Cups: Layer or swirl the orange and black cheesecake mixtures into the prepared cups on top of the crust, creating a visually dramatic and festive effect.
- Chill to Set: Refrigerate the assembled cheesecake cups for at least 2 hours to allow them to firm up and set properly.
- Decorate and Serve: Just before serving, top each cheesecake cup with Halloween-themed sprinkles or small candy decorations for a fun and festive touch.
Notes
- For added texture, sprinkle mini chocolate chips or crushed cookies between the cheesecake layers.
- Use clear cups or jars to showcase the colorful swirl effect and for a more festive presentation.
- These cheesecake cups can be made a day in advance and stored in the refrigerator to save time on the day of your event.