If you’ve ever dreamed of pulling a crackly, golden loaf from your oven with almost zero effort, this No-Knead Artisan Bread is about to become your new obsession. With just a handful of pantry staples and a little patience, you’ll produce a bakery-worthy loaf that smells heavenly, tastes incredible, and looks like it came straight from a rustic European café. Whether you’re a seasoned bread lover or a total beginner, this recipe will win your heart (and your taste buds) from the very first slice.
Ingredients You’ll Need
The beauty of No-Knead Artisan Bread lies in its simplicity, but every ingredient serves a vital role in shaping the bread’s flavor, crust, and crumb. Here’s what you’ll need to get started—each one is an essential building block for that signature result.
- All-purpose flour: Provides the structure and soft crumb; no need for specialty flours here.
- Salt: Enhances the flavor and helps regulate the yeast activity for an even rise.
- Instant yeast: Just a pinch does the trick; it gives the loaf its beautiful lift and open texture.
- Warm water (about 110°F): Activates the yeast and brings the dough together—aim for pleasantly warm, not hot.
- Extra flour or cornmeal for dusting: Prevents sticking and adds a little crunch to the bottom crust.
How to Make No-Knead Artisan Bread
Step 1: Mix the Dough
Start by grabbing a large mixing bowl and whisk together the flour, salt, and instant yeast. Pour in the warm water and stir everything with a wooden spoon or spatula until you have a shaggy, sticky dough. Don’t worry if it looks a bit messy—that’s exactly what you want. There’s no kneading required, just a quick stir to combine.
Step 2: The Long, Slow Rise
Cover the bowl tightly with plastic wrap and let the dough rest at room temperature for 12 to 18 hours. This slow fermentation is where the magic happens, developing deep flavor and an airy, open crumb. You’ll know it’s ready when the surface is dotted with bubbles and the dough has doubled in size.
Step 3: Shape the Loaf
Lightly flour your hands and a clean work surface. Gently turn the risen dough out onto the floured surface, being careful not to deflate all those lovely bubbles. Shape it into a rustic round loaf—no need for perfection here, the charm of No-Knead Artisan Bread is in its freeform beauty. Let it rest for 30 minutes, uncovered, while you move on to the next step.
Step 4: Preheat and Prepare
While the dough rests, preheat your oven to 450°F and place a Dutch oven (with the lid on) inside to heat up. This step is key for getting that iconic crisp crust. When the oven is hot, carefully remove the Dutch oven, sprinkle the bottom with flour or cornmeal, and gently transfer your dough inside.
Step 5: Bake to Perfection
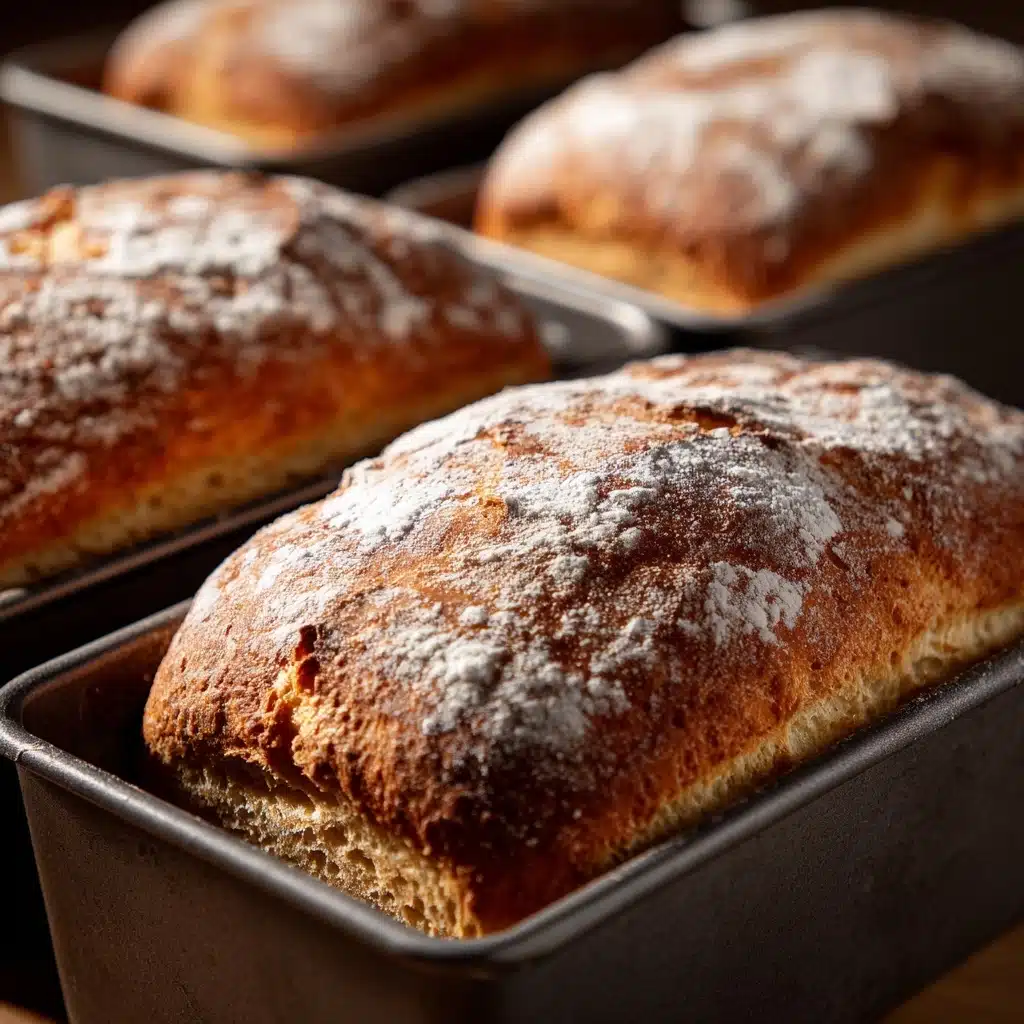
Cover your Dutch oven and bake for 30 minutes. Then, remove the lid and continue baking for another 10 to 15 minutes. This final blast of heat turns the crust a deep golden brown and fills your kitchen with the irresistible aroma of fresh bread. Let it cool on a wire rack for at least 30 minutes before slicing—trust me, the wait is worth it!
How to Serve No-Knead Artisan Bread

Garnishes
A sprinkle of flaky sea salt, a drizzle of good olive oil, or a scattering of fresh chopped herbs can take your No-Knead Artisan Bread from simple to sensational. For a special touch, rub a cut clove of garlic over the warm crust or add a dusting of grated parmesan right before serving.
Side Dishes
This bread is a natural partner for soups and stews—a bowl of tomato basil soup or a hearty beef stew makes a cozy meal complete. It’s also fantastic alongside salads, cheese boards, or even as the base for a rustic sandwich piled high with your favorite fillings.
Creative Ways to Present
Slice your No-Knead Artisan Bread thick and serve it in a bread basket lined with a pretty napkin, or tear it into rustic chunks for sharing. For breakfast, toast slices and top with avocado, smoked salmon, or a swipe of butter and jam. It’s also perfect for crostini or bruschetta at your next gathering.
Make Ahead and Storage
Storing Leftovers
Wrap any leftover No-Knead Artisan Bread in a clean kitchen towel or plastic wrap and keep it at room temperature for up to two days. This helps maintain the crust’s texture while keeping the inside soft and fresh.
Freezing
To freeze, slice the bread and place the pieces in a freezer-safe bag, pressing out as much air as possible. This way, you can grab a slice or two whenever you crave fresh bread—just pop them straight in the toaster or oven from frozen.
Reheating
Bring your No-Knead Artisan Bread back to life by warming slices in a toaster or wrapping the loaf in foil and heating it in a 350°F oven for 10 minutes. This revives the crust and gives you that just-baked flavor all over again.
FAQs
Can I use bread flour instead of all-purpose flour?
Absolutely! Bread flour will give you a slightly chewier texture and a bit more structure. Both flours work beautifully, so use whichever you have on hand.
Do I really need a Dutch oven?
A Dutch oven is ideal because it traps steam, creating that gorgeous artisan crust. If you don’t have one, use a heavy pot with a tight-fitting lid or try baking on a preheated pizza stone with an oven-safe bowl of water to create steam.
Can I add mix-ins to the dough?
Definitely! Fold in chopped herbs, roasted garlic, seeds, or shredded cheese right after you mix the dough. No-Knead Artisan Bread is endlessly customizable, so have fun experimenting.
Why does the dough have to rest so long?
The long, slow rise gives the yeast time to ferment the dough, which develops flavor, texture, and those beautiful air pockets. It’s totally worth the wait for the best possible loaf.
How do I know when my bread is fully baked?
Look for a deeply golden crust and listen for a hollow sound when you tap the bottom. If you’re unsure, an instant-read thermometer inserted into the center should read around 200°F.
Final Thoughts
Once you taste your first loaf of No-Knead Artisan Bread, you’ll wonder how you ever lived without it. With minimal effort and maximum reward, it’s a recipe that brings pure joy to any table. Give it a try and let the aroma and flavor of homemade bread brighten your day!
Print
No-Knead Artisan Bread Recipe
- Total Time: 13 hours (including resting time)
- Yield: 1 loaf (about 8 slices) 1x
- Diet: Vegan
Description
This No-Knead Artisan Bread recipe is a simple yet impressive homemade bread that requires minimal effort. With just a few basic ingredients and a long resting time, you get a crusty, golden brown loaf with a chewy interior, perfect for sandwiches or serving alongside your favorite dishes. No need for complicated kneading—just stir, rest, and bake in a preheated Dutch oven for an authentic bakery-style bread at home.
Ingredients
Dry Ingredients
- 3 cups all-purpose flour
- 1 1/2 teaspoons salt
- 1/2 teaspoon instant yeast
Wet Ingredients
- 1 1/2 cups warm water (about 110°F)
For Dusting
- Extra flour or cornmeal
Instructions
- Mix Ingredients: In a large mixing bowl, whisk together the flour, salt, and instant yeast thoroughly. Pour in the warm water and stir with a wooden spoon or spatula until a shaggy, sticky dough forms.
- First Rise: Cover the bowl tightly with plastic wrap and let the dough rest at room temperature for 12 to 18 hours. The dough should become bubbly on the surface and approximately double in size.
- Shape the Dough: Lightly flour your hands and a clean work surface. Turn the dough out onto the surface and gently shape it into a round loaf without deflating it too much.
- Second Rest: Let the shaped dough rest uncovered for 30 minutes while you preheat the oven to 450°F and place a Dutch oven with its lid inside to heat up.
- Prepare to Bake: Carefully remove the hot Dutch oven from the oven. Sprinkle the bottom with flour or cornmeal to prevent sticking and transfer the dough into the pot.
- Bake Covered: Cover the Dutch oven with its lid and bake the bread for 30 minutes. This traps steam, helping develop a crispy crust.
- Bake Uncovered: Remove the lid and bake the bread uncovered for an additional 10–15 minutes until the crust is deep golden brown and crisp.
- Cool: Remove the bread from the oven and transfer it to a wire rack. Let cool for at least 30 minutes before slicing to allow the crumb to set properly.
Notes
- For extra flavor, add herbs, garlic, or shredded cheese to the dough before the first rise.
- Store leftover bread wrapped at room temperature for up to 2 days or freeze slices for later use.
- Prep Time: 10 minutes (plus 12–18 hours resting time)
- Cook Time: 45 minutes
- Category: Bread
- Method: Baking
- Cuisine: American
Nutrition
- Serving Size: 1 slice
- Calories: 150
- Sugar: 0 g
- Sodium: 290 mg
- Fat: 0.5 g
- Saturated Fat: 0 g
- Unsaturated Fat: 0.5 g
- Trans Fat: 0 g
- Carbohydrates: 31 g
- Fiber: 1 g
- Protein: 4 g
- Cholesterol: 0 mg