
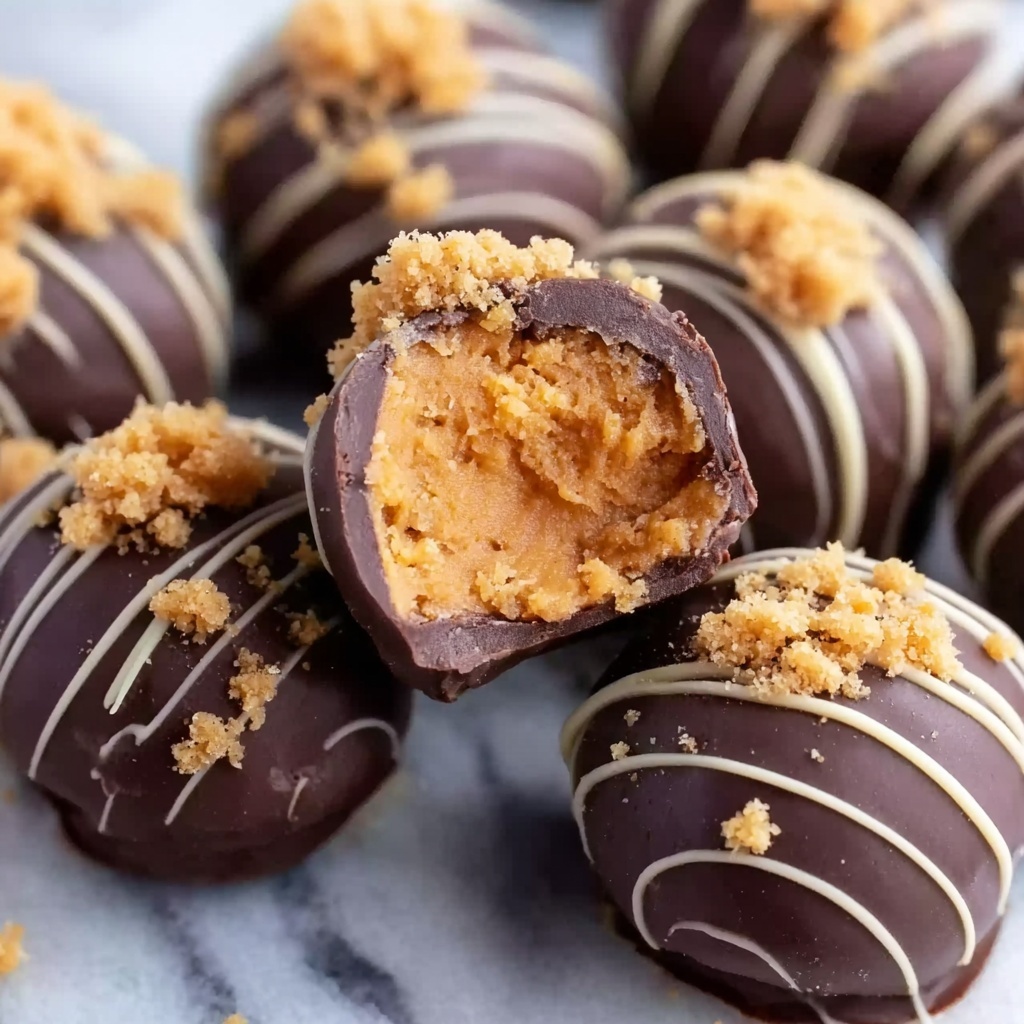
If you’ve ever dreamed of combining rich peanut butter, crunchy candy, and smooth chocolate into one irresistible treat, then this Butterfinger Balls Recipe is going to be your new favorite go-to dessert. These bite-sized delights pack a perfect balance of textures and a nostalgic flavor burst that instantly brightens any occasion. Whether you’re making them for a party, a special gift, or a sweet escape on a rainy afternoon, these Butterfinger balls will quickly become a classic in your recipe box.
Ingredients You’ll Need
The magic behind this Butterfinger Balls Recipe lies in how simple, everyday ingredients come together to create something truly spectacular. Each ingredient plays a crucial role, from the buttery richness to the crunch and sweetness, ensuring every bite is unforgettable.
- Powdered sugar: Adds sweetness and helps bind the mixture together with a smooth texture.
- Graham cracker crumbs: Provide a subtle crunch and a toasty flavor base that complements the peanut butter perfectly.
- Butterfinger bars, crushed: The star ingredient, bringing that signature crunchy candy flavor that defines this recipe.
- Melted butter: Adds richness and moisture, helping all the ingredients meld into one cohesive dough.
- Crunchy peanut butter: Infuses a salty depth and creamy texture with a satisfying nutty crunch.
- Chocolate almond bark or candy coating: Coats the balls in a luscious chocolate shell, adding snap and sweetness to each bite.
How to Make Butterfinger Balls Recipe
Step 1: Mix Ingredients
Start by grabbing a large bowl and combining the powdered sugar, graham cracker crumbs, crushed Butterfinger bars, melted butter, and crunchy peanut butter. Mix everything well until you get a smooth, sticky dough where every ingredient is evenly distributed—this step ensures every bite has that perfect harmony of flavors and textures.
Step 2: Form Balls
Once your mixture is ready, roll it into 1-inch balls using your hands. Don’t worry if they’re not perfectly round; these homemade treats have a charm in their imperfect shapes. Place the balls on a baking sheet lined with parchment paper to keep them from sticking and to make cleanup a breeze.
Step 3: Chill
Pop the baking sheet into the refrigerator for about 30 minutes. Chilling the balls helps them firm up, making them easier to dip without falling apart—it’s a crucial step for that perfect consistency.
Step 4: Melt Chocolate
While your balls chill, melt the chocolate almond bark or your preferred candy coating according to the package directions. Keep the chocolate smooth and warm enough for easy dipping but not so hot that it loses its shine.
Step 5: Dip Balls
Carefully dip each chilled ball into the melted chocolate, using a fork or dipping tool to submerge it completely. Let the excess chocolate drip off before placing the coated ball back onto the parchment paper. This process creates a smooth, glossy chocolate shell that adds a beautiful finishing touch.
Step 6: Set Chocolate
Allow the chocolate coating to set fully at room temperature or in the refrigerator. Once set, these Butterfinger balls are ready to be enjoyed or wrapped up as delightful gifts.
How to Serve Butterfinger Balls Recipe

Garnishes
For an extra-special presentation, consider sprinkling a little crushed Butterfinger candy or chopped peanuts on top of the chocolate before it sets. These garnishes add inviting texture and hint at the deliciousness hiding inside.
Side Dishes
Serve your Butterfinger Balls alongside a cold glass of milk or a hot cup of coffee for a classic pairing. Their rich, sweet flavors also complement fresh fruit like strawberries or apple slices, which can balance the decadence with a juicy freshness.
Creative Ways to Present
Try arranging these balls in colorful mini cupcake liners for an easy-to-grab, tidy treat perfect for parties or gift boxes. You can also skewer a few onto decorative sticks for a fun, bite-sized dessert pop that’s sure to impress guests.
Make Ahead and Storage
Storing Leftovers
Leftover Butterfinger Balls can be stored in an airtight container at room temperature for up to 3 days. For longer freshness and to keep that crisp chocolate shell intact, refrigerate them—they’ll last about a week when chilled.
Freezing
If you want to make these treat in advance, they freeze beautifully. Place the balls on a baking sheet to freeze individually, then transfer to a freezer-safe container or bag. They’ll keep for up to 3 months and make a wonderful surprise when pulled straight from the freezer.
Reheating
Butterfinger Balls are best enjoyed cold or at room temperature. If you prefer them softer, let them sit out for about 15 minutes. Avoid microwaving, as it can melt the chocolate coating and affect the texture.
FAQs
Can I use creamy peanut butter instead of crunchy?
Absolutely! Creamy peanut butter will give you a smoother texture but you’ll miss out on that delightful crunch that contrasts so nicely with the Butterfinger bits.
Is there a substitute for the chocolate almond bark?
Yes, any high-quality chocolate candy coating or melting chocolate works well. You can even use dark, milk, or white chocolate chips melted with a little coconut oil or shortening for a smooth finish.
How long do Butterfinger Balls last?
When stored properly in an airtight container, these treats typically stay fresh for up to a week in the refrigerator and about 3 days at room temperature.
Can I make these nut-free?
This particular recipe relies heavily on peanut butter, but you can experiment with sunflower seed butter or soy nut butter as a nut-free alternative. Just keep in mind the flavor and texture will vary slightly.
What’s the best way to crush the Butterfinger bars?
Place the bars in a large zip-top bag and gently crush them with a rolling pin or the bottom of a pan. You want small, even pieces—not powder—to maintain that crunchy texture in every bite.
Final Thoughts
I cannot recommend this Butterfinger Balls Recipe enough for anyone who loves a sweet, nostalgic, and super easy dessert. It’s one of those recipes that feels like a hug in food form—perfect for sharing with friends, family, or savoring quietly on your own. Give it a try and watch these little balls of joy disappear faster than you can say Butterfinger!
Print
Butterfinger Balls Recipe
- Prep Time: 15 minutes
- Cook Time: 0 minutes
- Total Time: 45 minutes
- Yield: 40 servings
- Category: Dessert
- Method: No-Cook
- Cuisine: American
Description
Butterfinger Balls are an irresistible no-bake treat featuring a rich mixture of crushed Butterfinger bars, powdered sugar, graham cracker crumbs, peanut butter, and melted butter, all coated in smooth chocolate. Perfect as a party snack or festive dessert, these bite-sized balls combine crunchy, sweet, and creamy textures for a delightful indulgence.
Ingredients
Main Ingredients
- 1 (16-oz) box powdered sugar
- 2½ cups graham cracker crumbs
- 5 (1.9-oz) Butterfinger bars, crushed
- 1¼ cups butter, melted
- 1½ cups crunchy peanut butter
- 1 (24-oz) package chocolate almond bark or preferred chocolate candy coating
Instructions
- Mix Ingredients: In a large bowl, combine the powdered sugar, graham cracker crumbs, crushed Butterfinger bars, melted butter, and crunchy peanut butter. Stir the mixture thoroughly until all ingredients are well blended and form a thick, consistent dough.
- Form Balls: Roll the prepared mixture into 1-inch diameter balls using your hands. Place each ball carefully onto a baking sheet lined with parchment paper to prevent sticking and facilitate easy handling.
- Chill: Refrigerate the balls for 30 minutes. This chilling step helps them firm up, making them easier to handle and allowing them to hold their shape during the dipping process.
- Melt Chocolate: Following the package instructions, gently melt the chocolate almond bark or your chosen chocolate candy coating until smooth and glossy. Use a microwave or double boiler for best results.
- Dip Balls: One at a time, dip each chilled ball into the melted chocolate, ensuring full and even coverage. Use a fork or dipping tool to lift the coated ball and allow any excess chocolate to drip off before placing it back onto a parchment-lined sheet.
- Set Chocolate: Allow the chocolate coating to set completely at room temperature or in the refrigerator. Once the chocolate has hardened, the Butterfinger Balls are ready to serve and enjoy.
Notes
- For easier handling, keep your hands slightly damp when rolling the balls to prevent sticking.
- Use crunchy peanut butter for the best texture contrast; smooth peanut butter can be substituted but will yield a softer texture.
- Store finished Butterfinger Balls in an airtight container in the refrigerator for up to one week.
- These treats can be frozen for up to three months; thaw in the refrigerator before serving.
- Substitute chocolate almond bark with semisweet or milk chocolate chips if preferred.


