
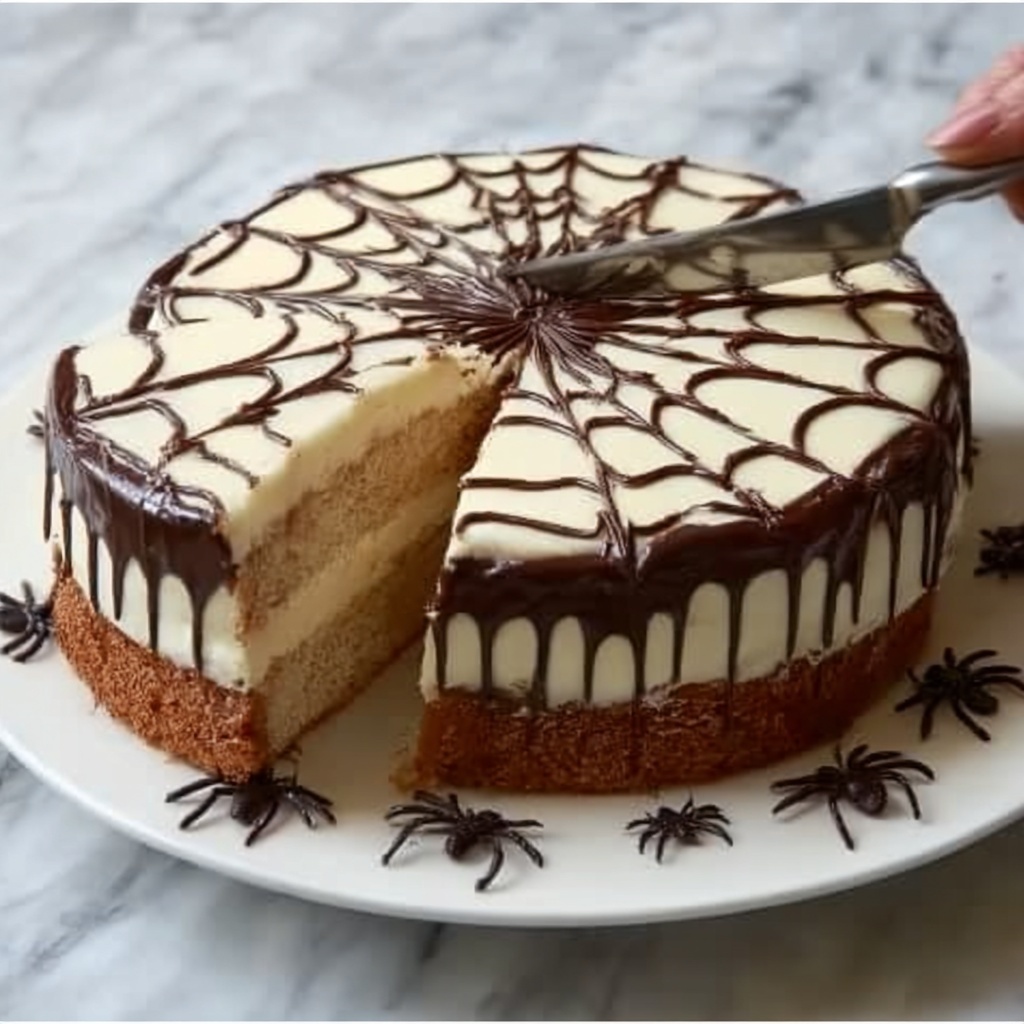
If you’re on the lookout for a dessert that’s as visually stunning as it is delicious, then this Spider Web Cheesecake Recipe is your new best friend. Imagine a creamy, velvety cheesecake base topped with a luscious chocolate ganache carefully decorated with a delicate spider web design that will wow your guests. This recipe brings together simple ingredients and straightforward steps to create a centerpiece dessert perfect for special occasions or whenever you want to impress with very little fuss. The contrast of rich cream cheese with the bittersweet chocolate ganache makes every slice a perfect bite of indulgence.

Ingredients You’ll Need
Gathering the right ingredients is the first step towards baking a fantastic spider web cheesecake. Each component plays a vital role in bringing the texture, flavor, and visual appeal to life in this Spider Web Cheesecake Recipe.
- Graham cracker crumbs: Provides a buttery, crunchy base that holds the cheesecake together beautifully.
- Unsalted butter, melted: Binds the crust ingredients and adds richness without overpowering the flavors.
- Granulated sugar: Used in both crust and filling to balance tanginess and provide sweetness.
- Cream cheese, softened: The star ingredient for that smooth, creamy body cheesecake lovers crave.
- Vanilla extract: Enhances the flavor of the filling, providing warm aromatic notes.
- Large eggs: Offer structure and moisture, ensuring the cheesecake sets beautifully.
- Sour cream: Adds a slight tang and extra creaminess to the filling for a perfect texture.
- Heavy cream (for filling and ganache): Contributes to the silkiness of the cheesecake and richness of the chocolate ganache.
- Semi-sweet chocolate, chopped: Key for the ganache that creates the gorgeous spider web effect on top.
- Chocolate spider decorations (optional): A fun, thematic garnish that takes your cheesecake presentation to the next level.
How to Make Spider Web Cheesecake Recipe
Step 1: Prepare the Crust
Begin by preheating your oven to 325°F (160°C). In a medium bowl, combine the graham cracker crumbs, melted butter, and the smaller amount of granulated sugar for the crust. Mix until every crumb is moist and coated. Press this mixture firmly into the bottom of a 9-inch springform pan to form an even crust. Bake it for 10 minutes, then set aside to cool completely. This step ensures the crust crisps up perfectly and forms a sturdy base for your cheesecake filling.
Step 2: Make the Cheesecake Filling
In a large bowl, beat the softened cream cheese until it’s completely smooth and free of lumps. Gradually add the larger portion of granulated sugar and the vanilla extract, mixing until everything is combined and glossy. Add the eggs one at a time, carefully mixing on low speed to keep the batter airy but well incorporated. Finally, fold in the sour cream—they bring a lovely subtle tang and luscious creaminess that prevents the filling from being too dense.
Step 3: Bake the Cheesecake
Pour the creamy filling onto your cooled crust and spread it out evenly. Place the springform pan in your preheated oven and bake for about 55 to 60 minutes. You’re looking for the edges to be set and the center to still be a little jiggly—this guarantees a flawlessly creamy texture once chilled. When baking time is up, turn off the oven but leave the cheesecake inside with the door slightly ajar for 1 hour to cool gradually. This helps prevent cracking by allowing the cheesecake to settle gently.
Step 4: Chill the Cheesecake
Once you’ve removed the cheesecake from the oven, let it cool to room temperature on the counter. Then, cover and refrigerate it for at least 4 hours, or ideally overnight. This resting time lets the flavors meld together and the texture firm up into that classic cheesecake richness.
Step 5: Create the Chocolate Spider Web Ganache
For the irresistible finish, heat the heavy cream intended for the ganache just until it starts to simmer. Pour it over the chopped semi-sweet chocolate in a bowl, and stir gently until the mixture is glossy and smooth. Pour this decadent ganache over the chilled cheesecake, letting it evenly coat the top. Using a piping bag, carefully pipe concentric circles or lines with melted chocolate, and then drag a toothpick through the circles from center outward to craft the signature spider web pattern. Precision here creates the magic.
Step 6: Serve and Enjoy
Now your masterpiece is ready to be chilled briefly if needed, then sliced and served. Add optional chocolate spider decorations for a festive touch, especially great for Halloween or themed parties. The Spider Web Cheesecake Recipe yields a stunning dessert that’s a guaranteed hit.
How to Serve Spider Web Cheesecake Recipe
Garnishes
When it comes to garnishing your spider web cheesecake, less is often more. A few chocolate spiders add delightful whimsy, but fresh raspberries or a dusting of cocoa powder complement the rich flavors beautifully without overwhelming the artful design. Whipped cream dollops on the side can also offer a light, airy contrast.
Side Dishes
Pairing this dessert with a side can elevate your experience. Fresh fruit salad or citrus sorbet provide a refreshing balance to the richness of the cheesecake. For coffee lovers, a dark roast espresso amplifies the chocolate notes, making your dessert time feel truly indulgent.
Creative Ways to Present
If you want to surprise your guests, serve individual mini cheesecakes with the spider web design piped on each one. Or place the whole cheesecake on a decorated platter lined with edible flowers or autumn leaves depending on the season. Presentation is a delightful way to maximize the wow factor of your Spider Web Cheesecake Recipe.
Make Ahead and Storage
Storing Leftovers
After enjoying your cheesecake, wrap any leftovers tightly in plastic wrap to prevent drying out and store in the refrigerator. It will stay fresh and creamy for up to 5 days, so you can savor each slice over the week.
Freezing
If you want to save the cheesecake for longer, it freezes wonderfully. Slice it into portions, wrap each piece securely in plastic wrap, then foil, and place in an airtight container. Frozen cheesecake can be kept for up to 2 months. Thaw overnight in the fridge before serving for best texture.
Reheating
Cheesecake is best enjoyed cold, so we don’t recommend reheating. Simply allow frozen slices to thaw gently in the refrigerator—this preserves the creamy texture and delicious taste without compromising quality.
FAQs
Can I use a different type of crust for this Spider Web Cheesecake Recipe?
Absolutely! While graham cracker crust is traditional and delicious, you can switch it with crushed digestive biscuits, chocolate cookies, or even a nut-based crust for a different flavor profile. Just make sure to adjust the sweetness accordingly.
How do I prevent my cheesecake from cracking?
Cracks often happen when the cheesecake cools too quickly or is overbaked. Baking at a low temperature, cooling slowly with the oven door ajar, and not over-mixing the batter can help you avoid this common problem.
Can I make this cheesecake gluten-free?
Yes! Simply use gluten-free graham crackers or cookie crumbs for the crust and ensure other ingredients like chocolate are certified gluten-free. This makes the Spider Web Cheesecake Recipe accessible to those with gluten sensitivity.
Is the sour cream essential in this recipe?
While sour cream adds tanginess and smooth texture, you could substitute it with Greek yogurt or crème fraîche in equal amounts. This tweak slightly changes flavor but maintains the creamy texture.
How do I pipe the perfect spider web design?
After pouring ganache on your cheesecake, pipe concentric circles with melted chocolate. Then, use a toothpick or skewer to drag from the center outward through the circles. This simple motion creates the spider web effect beautifully and doesn’t require professional decorating skills.
Final Thoughts
This Spider Web Cheesecake Recipe is all about bringing a bit of theatrical flair to your dessert table without any complication. I hope you give it a try and delight in the creamy, chocolatey goodness topped with a whimsical design that always sparks joy. It’s a crowd-pleaser that feels special but comes together smoothly thanks to simple ingredients and easy steps. Bake it for your next get-together — you won’t regret it!
Print
Spider Web Cheesecake Recipe
- Prep Time: 20 minutes
- Cook Time: 1 hour 10 minutes
- Total Time: 5 hours 30 minutes
- Yield: 12 servings
- Category: Dessert
- Method: Baking
- Cuisine: American
Description
This Spider Web Cheesecake is a stunning dessert featuring a creamy cheesecake base atop a buttery graham cracker crust, topped with a rich chocolate ganache patterned into a web design. Perfect for special occasions or Halloween celebrations, this recipe combines classic cheesecake flavors with an impressive decorative finish.
Ingredients
For the crust
- 1 ½ cups graham cracker crumbs
- ½ cup unsalted butter, melted
- ¼ cup granulated sugar
For the cheesecake filling
- 4 (8 oz) packages cream cheese, softened
- 1 cup granulated sugar
- 1 teaspoon vanilla extract
- 4 large eggs
- 1 cup sour cream
- ½ cup heavy cream
For the chocolate ganache
- 8 oz semi-sweet chocolate, chopped
- ½ cup heavy cream
For garnish
- Chocolate spider decorations (optional)
Instructions
- Preheat oven: Preheat your oven to 325°F (160°C) to prepare for baking the crust and cheesecake.
- Prepare crust: In a medium bowl, mix the graham cracker crumbs, melted butter, and ¼ cup granulated sugar until evenly combined. Press this mixture firmly into the bottom of a 9-inch springform pan.
- Bake crust: Bake the crust for 10 minutes, then remove from oven and let it cool completely before adding the filling.
- Make cheesecake filling: In a large mixing bowl, beat the softened cream cheese until smooth. Gradually add 1 cup sugar and vanilla extract, mixing well to combine.
- Add eggs and sour cream: Add the eggs one at a time, mixing on low speed after each addition until just incorporated. Gently fold in the sour cream to maintain a creamy texture.
- Assemble cheesecake: Pour the filling over the cooled crust, spreading it evenly with a spatula.
- Bake cheesecake: Bake for 55-60 minutes until the edges are set but the center remains slightly jiggly to ensure a perfect creamy texture.
- Cool in oven: Turn off the oven and leave the cheesecake inside with the door ajar for 1 hour to prevent cracks by cooling gradually.
- Chill cheesecake: Remove from oven and let it cool to room temperature. Refrigerate for at least 4 hours or preferably overnight for the best texture and flavor.
- Prepare ganache: Heat the ½ cup heavy cream in a small saucepan until simmering, then pour over the chopped semi-sweet chocolate. Stir until the mixture is smooth and glossy.
- Decorate cheesecake: Pour the chocolate ganache evenly over the chilled cheesecake. Use a piping bag to create a spider web design on top of the ganache for a festive look.
- Serve: Garnish with optional chocolate spider decorations if desired. Serve chilled and enjoy your festive spider web cheesecake!
Notes
- Ensure cream cheese is fully softened to avoid lumps in the filling.
- Use room temperature eggs for smoother incorporation.
- Do not overbake the cheesecake; it should be slightly jiggly in the center when done.
- Allow the cheesecake to cool gradually to prevent cracks.
- Refrigerate overnight for the best flavor and texture.
- Chocolate ganache will thicken as it cools, so pour while still warm for an even layer.
- Optional chocolate spider decorations add a fun Halloween touch but can be omitted.


